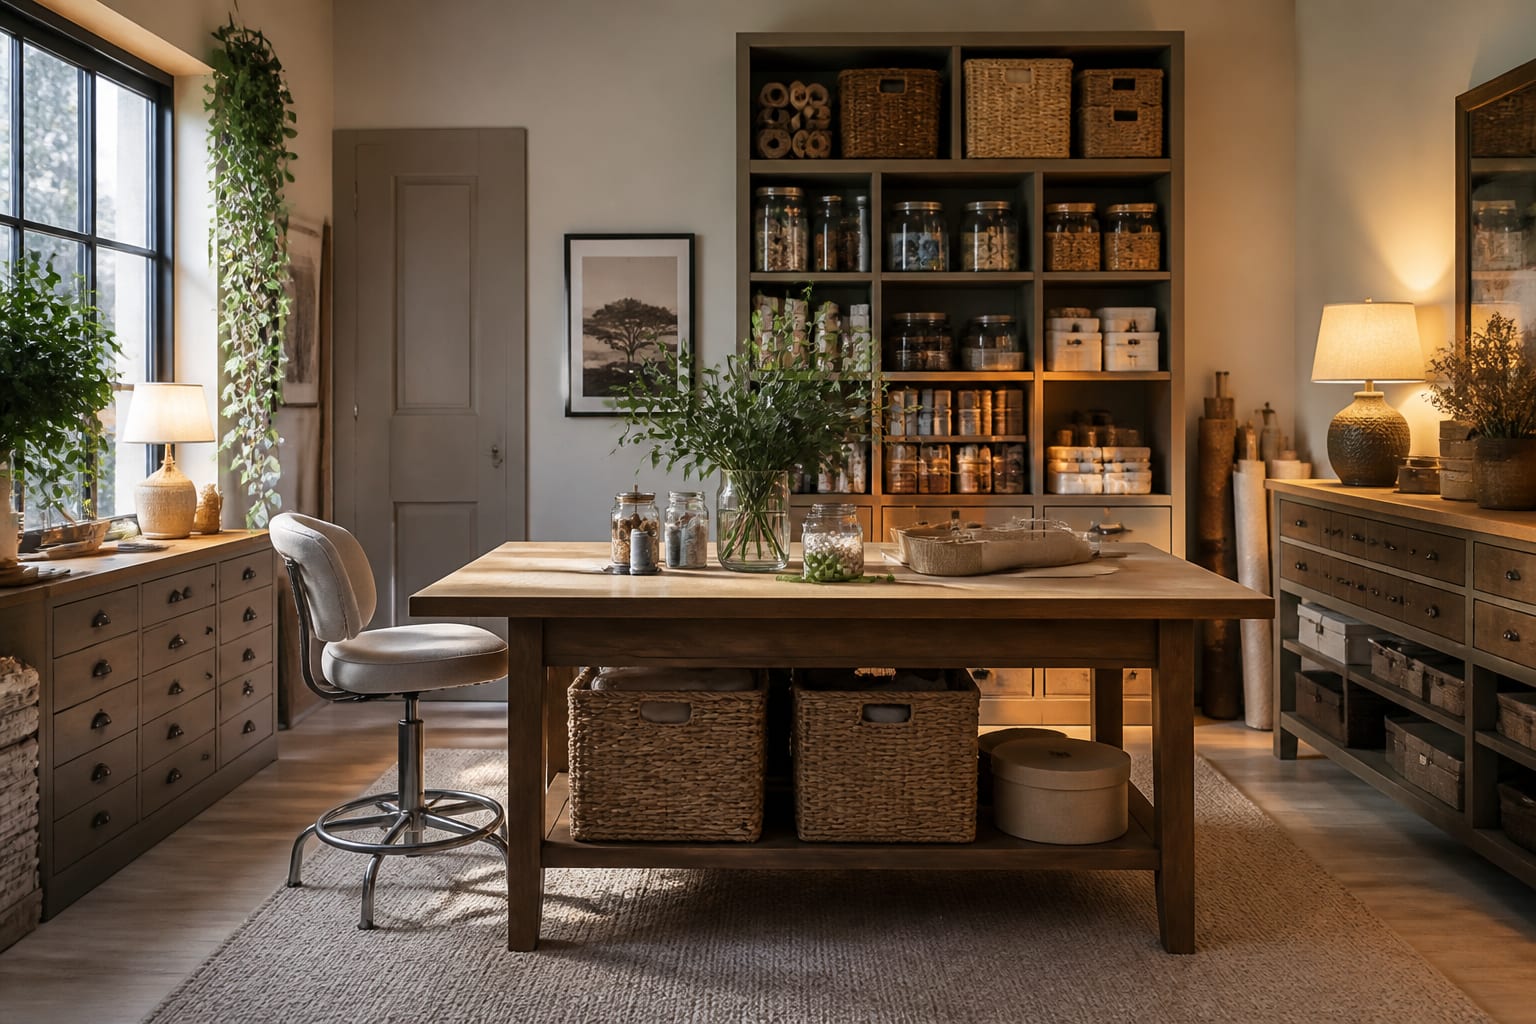
A craft room lives or dies by storage, and most people get it backward by buying pretty furniture before solving where the supplies go. Function has to lead here, because a hobby space that buries your materials in opaque drawers will always default back to a cluttered table. The rooms that work treat visibility and reach as non-negotiable: you should see what you own and grab it without standing up. Build around a generous work surface, smart vertical storage, and honest lighting, and the room earns its keep instead of becoming the place projects go to stall.
How do you organize craft supplies so you actually use them?
Visibility beats capacity every single time in a craft room. The most common mistake is buying a wall of opaque drawers, sealing every material out of sight, and then forgetting half of what you own within a month. The fix is storage you can see into: clear-front bins, glass jars for buttons and beads, open shelving, and labels on anything that hides its contents. Group supplies by activity rather than by type, so everything you need for one project lives together and you are not crossing the room mid-task. Frequently used tools belong at arm's reach, ideally hung on a pegboard or standing in a caddy on the table, while seasonal or bulky materials can climb to higher shelves. Vertical storage is your best friend because it preserves the work surface, which is the most valuable real estate in the room. A pegboard above the desk holds scissors, rulers, and spools where you can see and grab them. Drawer organizers stop small items from sliding into a tangled heap. Roll-out carts let you wheel a project's materials to wherever the light is best, then tuck them away when you are done. The discipline that keeps it working is regular editing. Crafters accumulate, so set a rhythm to cull dried-out markers, fabric scraps you will never use, and tools you have replaced. A room organized by what you reach for, kept honest with labels and a periodic purge, stays usable for years rather than collapsing back into chaos after the first ambitious project.
See also our guide to Sewing Craft Room Design Ideas for more on craft room ideas.
What makes a good craft room work surface?
Your work surface determines what you can make, so size it for your most demanding task instead of an average one. Quilters and sewists need real depth, often a table large enough to lay out and cut fabric without it draping onto the floor. Painters and paper crafters want a surface that wipes clean and tolerates a dropped blade or a glue spill. I recommend a height slightly above a standard desk for anyone who works standing, since hunching over a low table wrecks your back during long sessions. Counter height suits cutting and standing work, while a seated desk height fits detail work and machine sewing. A large central table that you can walk around beats a desk pushed to the wall, because access from multiple sides changes how freely you work on big pieces. If space is tight, a folding or drop-leaf table expands when you need it and disappears when you do not. Build in a cutting mat and protect the top with a hardwearing surface so you never hesitate to use it. Power matters more than people plan for. Run a power strip along the back edge for irons, machines, glue guns, and heat tools, and keep cords managed so they never drag through your project. Leave clear margin around the active zone for the tools you are using right now. The best work surfaces feel generous and unprecious, a place you can make a mess and clean it up, rather than a delicate piece of furniture you are afraid to actually work on.
For a related angle on craft room ideas, read Kitchen Backsplash Ideas.
How should you light a craft room?
Lighting in a craft room is a tool, not an afterthought, because color and detail work demand accuracy that a single warm ceiling bulb cannot deliver. You want bright, neutral-to-cool task light directly over your work surface so colors read true and your hands cast no shadow across the project. Warm, yellow light flatters a living room but distorts fabric dyes, paint, and thread colors, which leads to mismatches you only notice in daylight. A daylight-balanced bulb or LED panel solves this. Layer your lighting just as you would elsewhere: bright overall ambient light so the whole room is usable, plus focused task lighting where the precise work happens. An adjustable lamp with a flexible arm lets you aim light exactly where a stubborn stitch or a fine detail needs it. If your room has a window, position the main table to borrow that natural light during the day, since daylight remains the best reference for true color. Reduce glare on glossy surfaces and screens by avoiding fixtures that point straight into your eyes. For close detail work, a magnifying lamp with a built-in ring light earns its place fast, sparing your eyes during beadwork, embroidery, or model building. Put the task lights on their own switch so you can run them independently of the room. Brightness you can adjust is ideal, because cutting a pattern wants full power while a relaxed evening of knitting wants something softer. Get the light right and your finished projects stop surprising you with colors that looked fine under the wrong bulb.
How do you fit a craft room into a small or shared space?
Most people do not have a dedicated room, and a craft zone carved from a shared space can work beautifully with the right strategy. The principle is containment: everything the hobby needs should fold, roll, or close so the space resets cleanly when you are done. A tall cabinet with doors hides supplies and a fold-down work surface in one footprint, turning a closet or a corner into a station that vanishes when company arrives. Rolling carts are the hero of shared spaces because you can pull a full project setup out, work, then wheel it back into a closet. Use the back of a door for a hanging organizer that holds rulers, ribbon, and small tools without claiming floor area. Wall-mounted everything keeps the floor clear, which makes a small space feel far larger and easier to clean. If the craft zone shares a guest room or an office, define it visually with a rug or a different paint color so it reads as its own pocket rather than clutter spilling into the room. Choose furniture that pulls double duty, like an ottoman that opens for yarn storage or a desk that serves both crafting and bill-paying. Keep a single, contained mess zone so projects in progress do not creep across the whole room. The honest test for a shared craft space is whether you can pack it away in five minutes. When the answer is yes, you will actually start projects, because the cost of cleanup no longer outweighs the joy of beginning.
- Store materials in clear-front bins and glass jars so you see everything you own
- Hang a pegboard above the desk for scissors, rulers, and spools within reach
- Use a large central table you can walk around for cutting and big projects
- Run a power strip along the back edge for irons, machines, and glue guns
- Light the surface with a daylight-balanced panel so colors read true
- Add a rolling cart to wheel a project's supplies wherever the light is best
- Mount a fold-down work surface inside a cabinet for small or shared rooms
- Add a magnifying lamp with a ring light for beadwork and fine detail tasks
Bring the look home with Re-Design
Planning a craft room is easier when you can see it first. Upload a photo of your spare room, closet, or corner to Re-Design and preview shelving layouts, table placement, and wall colors before you buy anything. Test a central table against a wall-mounted fold-down surface, or see how open shelving versus a closed cabinet changes the feel. Re-Design lets you settle the layout questions on screen instead of after a return-shipping headache.
Frequently Asked Questions
What is the most important thing in a craft room?
Visible, accessible storage. A craft room fails when supplies disappear into opaque drawers and get forgotten. Clear-front bins, open shelving, and labeled jars let you see and grab what you own, which keeps projects moving. Pair that visibility with a generous work surface, and the room supports creating instead of constant searching and tidying.
How big should a craft table be?
Size it for your most demanding task. Sewists and quilters often need a surface large enough to lay out and cut fabric, while a paper crafter can work smaller. A table you can access from multiple sides beats one shoved against a wall. If space is limited, a drop-leaf or folding table expands only when you need it.
Can I set up a craft room in a small space?
Absolutely. The trick is containment: choose furniture that folds, rolls, or closes so the area resets in minutes. A cabinet with a fold-down surface, rolling carts, and wall-mounted storage carve a full station from a closet or corner. Define the zone with a rug or paint so it feels intentional rather than clutter.