Choose drywall when you want a finished look and don't need utility access; paint the joists black when you need every inch of headroom and easy plumbing access; choose tongue-and-groove plank when you want warmth without losing as much height as drywall. A drop ceiling is the safe default, but it is rarely the right answer for a room people are actually supposed to want to spend time in. The three basement drop ceiling alternatives above cover almost every real basement: a polished family room, a low-ceiling gym or media zone, and a warm hangout that doesn't read industrial.
What can you do instead of a drop ceiling in a basement?
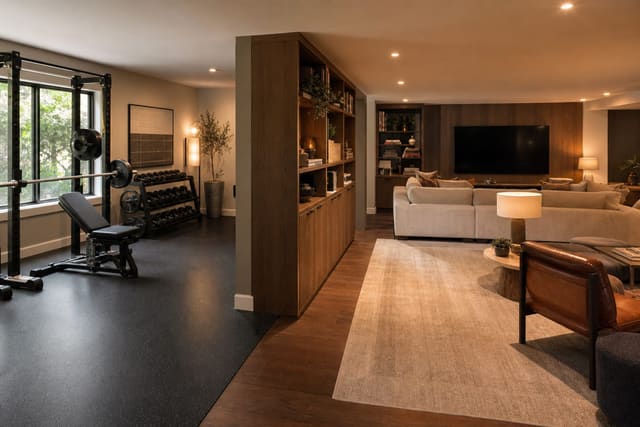
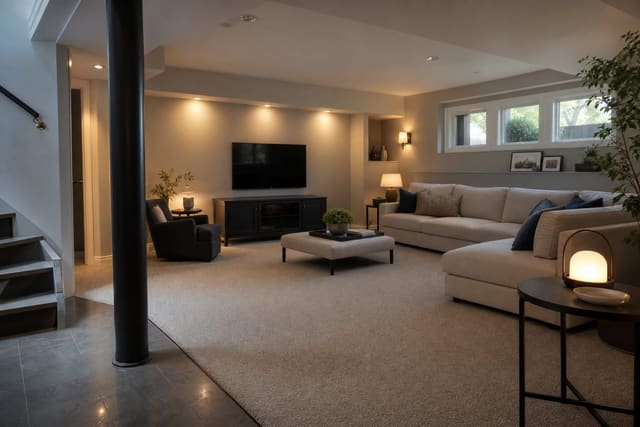
The four basement ceilings worth considering are drywall, painted exposed joists, tongue-and-groove plank, and metal or PVC tin tile. Drywall gives the cleanest finished-room read and is right when the basement is the upstairs of the house, not a utility room with a couch. It costs $3-$6 per sq ft installed, and the 5/8 in. drywall most codes require shaves about that much from headroom.
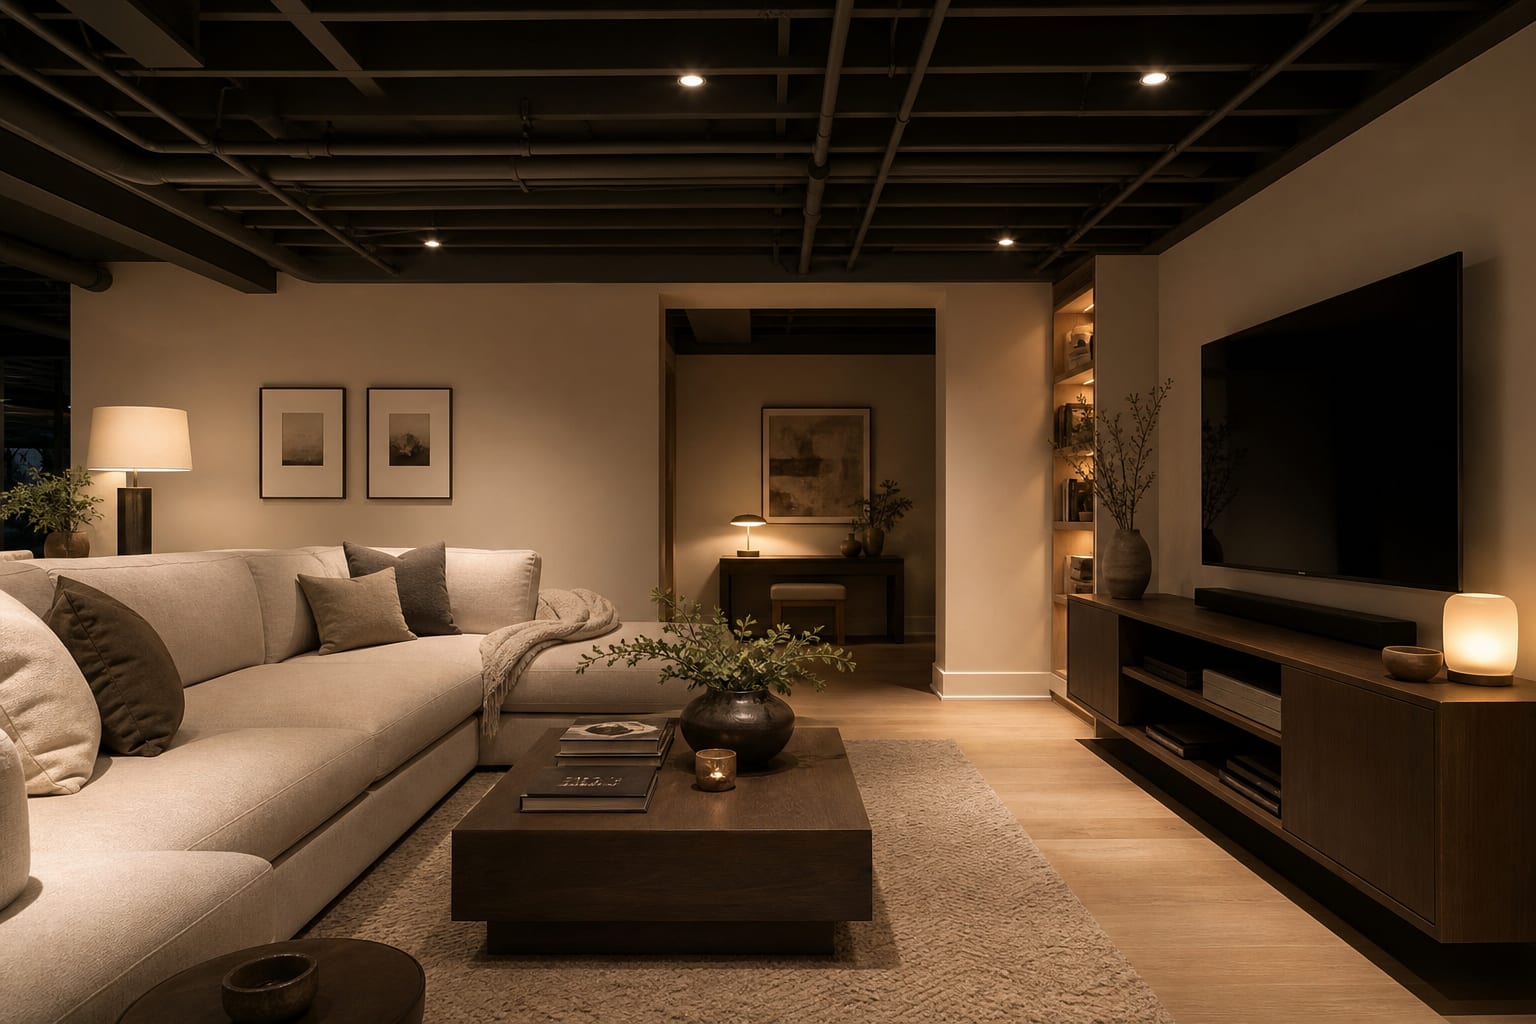
Paint the joists when the basement starts under 90 in. floor-to-joist. Black or deep charcoal absorbs the eye so a 7 ft basement reads taller than the same room with a 6 ft 6 in. drywall lid. Pair painted joists with basement gym and entertainment zoning so the exposed ceiling reads intentional.
Plank ceilings, usually 1x4 or 1x6 pine or pre-primed MDF, mount to joists at 16 in. on center. They take about 1 in. of headroom and bring warmth drywall cannot fake. Tin or PVC tile is the niche pick: best for a defined ceiling moment over a bar or media wall. Plan it like a basement bedroom layout where every surface earns its visual weight.
The ceiling decision that changes the whole basement
The big tradeoff is not aesthetic. It is access. Drywall is the most finished option and the worst one if a hose bib starts dripping above it. Below is the decision matrix most basements need.
| Ceiling option | Best fit | Headroom loss | Installed cost per sq ft | Utility access | | --- | --- | --- | --- | --- | | 5/8 in. drywall | Finished family room, no future renovations | About 5/8 in. plus furring | $3-$6 | Add 16 in. access panels at every shutoff | | Painted exposed joists | Low-ceiling basements under 7 ft, gyms | 0 in. | $1-$2 paint and primer only | Full access; mechanicals stay visible | | Tongue-and-groove plank | Warm family rooms, lounges | About 1 in. | $4-$8 | Same access panel discipline as drywall | | Metal or PVC tin tile | Bar zones, ceiling features under 60 sq ft | About 1-2 in. | $6-$12 | Tiles can be lifted like a designer drop ceiling |
The most useful spec on that table is the headroom column. Code in most jurisdictions wants 7 ft (84 in.) of finished basement headroom, with allowances for ducts and beams down to about 6 ft 4 in. If the floor-to-joist measurement is already 84-86 in., drywall pushes the room into the gray zone, which complicates resale appraisals and future permits.
The second most useful spec is the access panel rule. Every cleanout, hose bib, gas shutoff, and junction box needs to stay reachable without a Sawzall. A 16 in. by 16 in. plastic access panel runs $30-$50 and is non-negotiable for any drywall or plank ceiling.
Preview each ceiling treatment on your basement photo before you buy the drywall.
What the painted-joist look actually requires
Painting the joists looks effortless in finished photos and is the most prep-heavy of the four options. The joists, subfloor, ductwork, conduit, and HVAC trunk all read as one plane only when they share the same color. Plan the work in this order:
- Mask duct insulation, electrical panels, and any wiring you do not want painted.
- Vacuum a decade of dust off every web and joist bay so primer actually bonds.
- Prime raw wood with a latex stain-blocker and metal with an oil-based bonding primer.
- Roll or spray two coats of flat ceiling paint in a deep charcoal or true black.
Budget 18-24 hours of labor per 400 sq ft for a DIY crew of two. A pro spray crew finishes the same room in 4-6 hours but charges $2-$4 per sq ft. Leaving a galvanized duct silver against a black joist breaks the illusion that the ceiling is a deep, recessed plane, so every surface needs to share the color.
A black ceiling absorbs roughly 80% of incident light, so the existing 60 watt equivalents that lit the basement before painting will feel like 30. Plan for 200-400 watts of total 2700K LED output per 100 sq ft, distributed across recessed cans, surface-mount disks, or pendants that drop the source 12-18 in. below the joist plane.
Common basement drop ceiling mistakes to avoid
The most expensive mistake is drywalling over a basement with active mechanical issues. If the sewer cleanout, water shutoff, or condensate line sits above the ceiling and the basement has any history of moisture, drywall traps the problem. Map every shutoff before the first sheet goes up.
The second mistake is treating painted joists as a no-budget option. The paint is cheap; the prep, the lighting upgrade, and the duct cleanup are not. A halfway painted-joist basement with silver ducts and a single bulb looks worse than the unfinished version.
The third mistake is mounting plank directly to bouncy joists. If the upstairs floor flexes, the plank ceiling telegraphs every footstep as a creak. Add cross-blocking at 48 in. on center between joists before installing the plank.
The fourth mistake is putting a drop ceiling back in after the painted-joist look fails because the lighting was never solved. Add 2-3 more light sources before condemning the look. If the basement floor is bare concrete, address that with the right carpet over concrete basement approach so the whole room feels resolved.
The fifth mistake is choosing tin tile for the whole ceiling. Tin reads as a feature. Use it over a 40-60 sq ft bar or media wall, never whole-basement coverage.
Use AI design to preview your basement ceiling before you build
A basement is the room where the ceiling decision changes everything and the room where it is hardest to picture from a Pinterest board. Upload one straight photo of the basement in daylight that includes the joists, ductwork, walls, floor, and any windows, then test drywall, painted joists, plank, and a tin accent from the same camera angle. The goal is not to let a preview pick the paint color; it is to see whether the basement wants a finished lid, a recessed dark plane, or a warm planked one before any material gets ordered.
Be specific in the prompt. Ask for a flat charcoal painted ceiling with the ducts and conduit painted to match, or a white 1x6 plank ceiling with 4 in. recessed cans, or a 5/8 in. drywall ceiling with two access panels at the corners. If the preview makes the basement read shorter, that is a warning worth hearing before you build.
Frequently Asked Questions
What is the cheapest alternative to a drop ceiling in a basement?
Painted exposed joists are the cheapest finished basement ceiling. Total material cost lands around $1-$2 per sq ft for primer, paint, masking, and brushes, with no lumber or drywall to buy. The labor is high but DIY-friendly. The catch is the lighting upgrade: budget another $200-$600 for warm LED fixtures, because a dark ceiling without enough light defeats the point.
Can I drywall over joists that have plumbing or shutoffs in them?
Yes, but every shutoff valve, cleanout, and junction box must get a code-compliant access panel before the drywall goes up. The standard 16 in. by 16 in. plastic access panel runs about $30-$50 and screws into the framing flush with the drywall. Map every utility on a floor plan, plan a panel for each one, and add a labeled sticker inside listing what it accesses.
Does painting the basement joists black actually look good?
Yes, when the whole ceiling plane reads as one color and lighting is upgraded to compensate. Black or deep charcoal makes joists, ducts, and conduit visually disappear, which adds perceived height to a low basement. The look fails when ducts stay silver or when the only light source is a 60 watt bulb in the middle of the room.
What ceiling type is best for a basement with low headroom?
Painted exposed joists are the best choice when finished headroom is already at or near the 84 in. (7 ft) code minimum. They take zero additional height, while drywall takes 5/8 in. or more and plank takes about 1 in. Painted joists also let the room keep the full joist depth as visual interest, which makes a 6 ft 10 in. basement feel taller than the same room with a 6 ft 5 in. drywall lid.
How do I keep access to a water shutoff in a drywalled basement ceiling?
Install a plastic or metal access panel at the shutoff before the drywall goes up. A 14 in. panel reaches most ball valves; a 16 in. panel covers larger gate valves and unions. Locate it where furniture will not block it. Label it on the inside with the valve type, the line it controls, and the install date.
Will a plank ceiling make basement noise worse?
A plank ceiling can amplify upstairs footfall by 3-5 decibels if the joists flex. Add cross-blocking at 48 in. on center, use construction adhesive plus fasteners, and consider 5/8 in. drywall as a noise-deadening layer on the loudest 100 sq ft. None of those moves cost much during install and they are nearly impossible to add later.