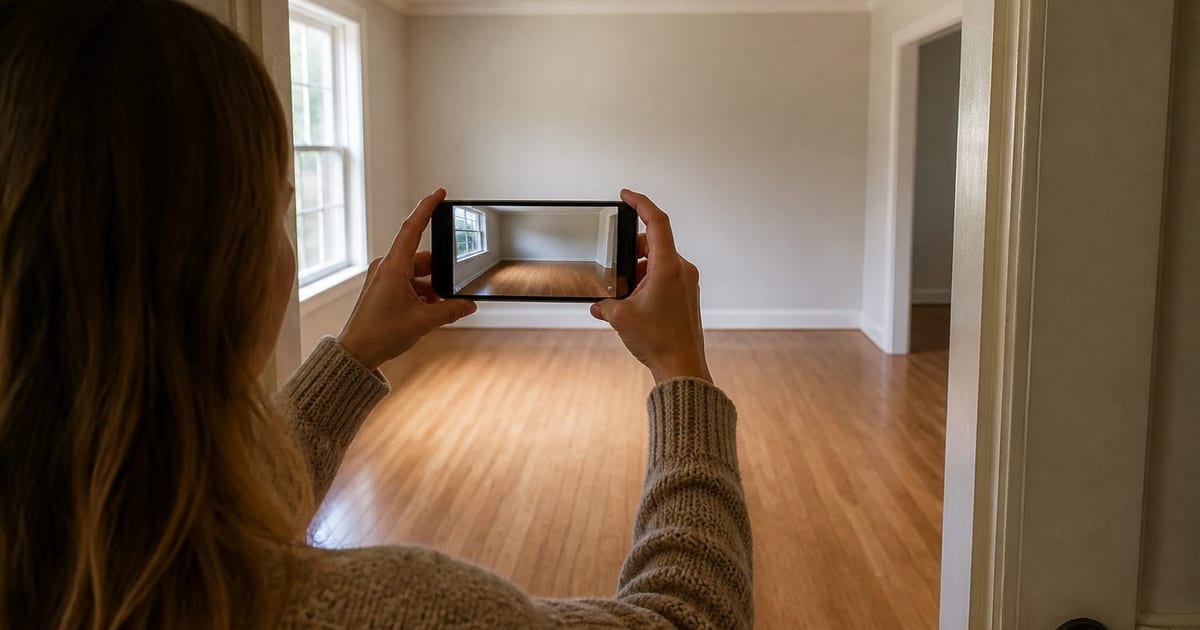
Stand back from the doorway, shoot at eye level, use natural light from one direction, keep the lens straight with no tilt, and capture the full architectural frame — at least one full wall, the ceiling line, and the floor in shot. Those five rules separate a usable AI design upload from a crooked, half-cropped frame that wastes a render. The phone in your pocket is enough; the discipline is what matters. Most poor AI design results come from poor input photos, not from the model, and a 5-minute reshoot fixes 80 percent of the complaints.
The 5-rule shooting checklist
Run the checklist before every upload. Each rule corresponds 1:1 to a Key Takeaway above, so a quick scan of the list is enough on the third shoot.
- Stand back from the doorway. Step into the room, then back through the doorway until you can see one full wall, the ceiling line, and the floor in the same frame. In a 12 ft x 14 ft room that usually means about 8 ft of back-up, which often means leaning into the hallway.
- Shoot at eye level. Hold the phone at 60 in. above the floor, not at chest height (~48 in.) and not low (~36 in.). Eye-level matches the perspective the model expects and is the single biggest fix for distorted renders.
- Use one natural light direction. Turn off ceiling and table lamps. Open one window or curtain and let daylight come from a single side. Mixed light — daylight plus tungsten plus a screen — confuses the white balance and the render.
- Keep the lens straight, no tilt. Hold the phone vertical-up, not tilted up or down. A tilted phone produces converging verticals (walls that lean inward), which the model amplifies into a funhouse render.
- Capture the full architectural frame. The render works from what it can see. Crop in your editor afterward; in the shot itself, include one full wall, the ceiling line, the floor, and at least one corner. Skip HDR and wide-angle mode for the upload.
Open Re-Design and upload your photo now once the five rules are in place. The 30 seconds spent reshooting will save the cost of two or three wasted renders.
Why these five rules matter to the render
AI design models read the architecture in your photo and treat it as fixed reference. If the architecture is distorted in the input — a leaning wall, a crushed ceiling line, a cropped floor — the render inherits and amplifies that distortion, then ships you a result that looks slightly wrong without telling you why. The five rules above are not a list of best practices; they are the assumptions the model is making about your input, written down.
Eye level is the most load-bearing of the five. A standard phone lens at 60 in. produces close to a 35mm equivalent field of view at a natural perspective. Shoot the same room from chest height and the same render will look squat; shoot it from the floor and the ceiling will balloon outward. Designers, real estate photographers, and Architectural Digest contributors all default to 60-66 in. for the same reason. Borrow the discipline; you do not need their gear.
Light direction matters less than amateurs think and more than the model can recover. The single best upload light is overcast midday with the room's windows uncovered and every electric light off. Second best is a sunny day with the curtains diffused to one side. The model can correct a slightly underexposed photo; it cannot correct a backlit silhouette where the window blows out the entire wall behind your sofa. See the AI design complete guide for the full capability-and-limit map of which input problems the model can recover from.
Common photo mistakes that ruin an AI design render
The most common mistake is shooting from chest height into a sunlit window. The phone meters for the bright window, the room behind it goes dark, the AI model sees a backlit silhouette, and the render comes back muddy. The fix is one step to the side so the window is not directly behind your subject wall, and a tap on the dark area of the screen to re-expose for the room interior.
The second mistake is wide-angle mode. The 0.5x lens on most phones is a 13-16mm equivalent fisheye, which is great for capturing a whole room in a Zillow listing and terrible for an AI design render. The model assumes a standard 35-50mm lens and produces over-stretched results when you feed it ultra-wide input. Use the 1x lens every time, even if it means stepping into the hallway to fit the room.
The third mistake is the tilted phone. Hold the phone vertical-up — both the top and bottom edges should be parallel to the wall behind the camera. A 5-degree downward tilt is enough to bow the verticals visibly in a render. If your phone has a built-in level (iPhone Camera app, Settings → Camera → Grid → Level), turn it on. Center the level cross before you press the shutter.
The fourth mistake is HDR processing for AI uploads. HDR fuses multiple exposures into one image with a flat, computer-corrected look that the AI model reads as low-information. Turn HDR off in the camera app for AI uploads. Same for any beauty filter or auto-enhance.
The last mistake is cropping the architectural frame too aggressively before upload. Send the model the wide shot. You can always crop the result. You cannot uncrop a wall the model never saw.
Use AI design to test what the photo unlocks
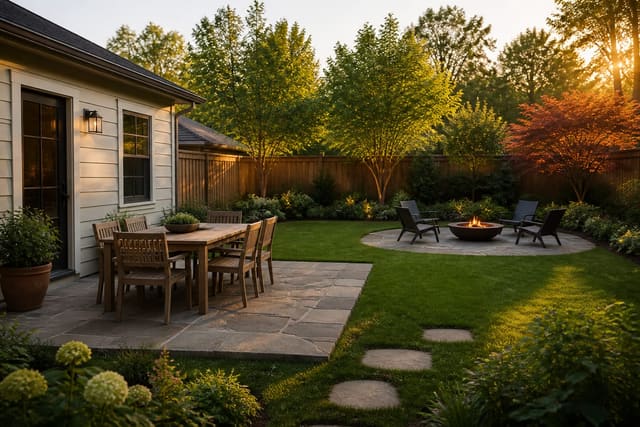
Once the photo passes the five rules, the workflow speeds up. Upload the room once, then run three prompts on the same upload: a paint test, a furniture test, a lighting test. The same photo also unlocks an outdoor flow — the same shooting rules apply to backyards, patios, and front entries, with the doorway test replaced by the property-line test. See backyard design for the outdoor parallel and the photo specs that make zone planning render correctly.
The shooting discipline is most of the work. The prompt is the easy part. A specific prompt — "warm minimal living room with a 9 ft cream sofa, oak coffee table, 2700K floor lamp in the reading corner" — produces a usable render on the first or second try when the photo is right. The same prompt on a tilted, backlit, chest-height shot will fail no matter how many times you re-roll. Spend the 5 minutes on the photo.
Frequently Asked Questions
Phone or DSLR for AI design photos?
A modern phone is enough — and for most rooms, better than a DSLR. Phones default to a 24-26mm equivalent main lens that approximates the 35mm look AI models expect, and the auto-exposure handles mixed light well. A DSLR with a 35mm prime is the gold standard if you already own one. Avoid action cameras, fisheye lenses, and 360-degree cameras; the AI model is not trained on those.
Should HDR be on or off?
Turn HDR off for AI design uploads. HDR blends multiple exposures into a flat, low-information image that the AI model reads as already-processed and tends to over-correct. A single-exposure photo, slightly under-exposed if the window is bright, gives the model more usable data. Re-enable HDR for everything else; it just hurts AI uploads specifically.
Do I need a wide-angle lens for small rooms?
No. Skip the 0.5x ultra-wide lens; it produces fisheye distortion the model amplifies. Stand back instead — back through the doorway, into the hallway, or even into the next room with the door open. If a 10 ft x 10 ft room genuinely will not fit at 1x, take two photos from opposite corners and upload each separately. Two clean shots beat one distorted ultra-wide.
What if the room has no window?
For a windowless bathroom, closet, or interior room, use the brightest single source you have — overhead ceiling light, vanity light, or a portable LED panel — and turn the others off. The goal is one light direction, not a specific source. Set the white balance to the bulb temperature (warm white = ~2700K, daylight LED = ~5000K) and shoot at 1x. The render quality will still drop slightly versus a daylight room; that is the cost of the missing window.
Can I stitch a panorama for AI design?
Do not stitch a panorama for AI design uploads. Panorama mode warps perspective at the seam and produces an image the model treats as distorted. If a single shot will not capture the room, take two flat 1x photos from opposite ends and upload each separately. Run prompts on each and combine the directions yourself; the tool will give better answers on two clean inputs than on one stretched composite.