The line between a DIY project that looks designed and one that looks like a craft fair is almost always precision, not skill. A gallery wall reads expensive when the frames are aligned to the same spacing and the mats are generous; it reads amateur when the gaps wander. The good news is that the projects with the highest payoff are the simplest ones, and most cost under $60 and take an afternoon. You do not need to sew, weld, or own a table saw. You need a level, a tape measure, and the patience to do the boring measuring step that separates polished from sloppy.
Why most DIY decor looks cheap, and how to fix it
The failure mode of DIY decor is almost never the idea. It is the execution details that the eye registers instantly: crooked spacing, a finish that screams hot glue, or a color palette that fights itself. Professionals win on restraint and repetition. They pick one accent color and use it three times, they keep frame styles consistent, and they leave breathing room around objects instead of cramming a shelf. Copy those habits and even a $20 project looks intentional.
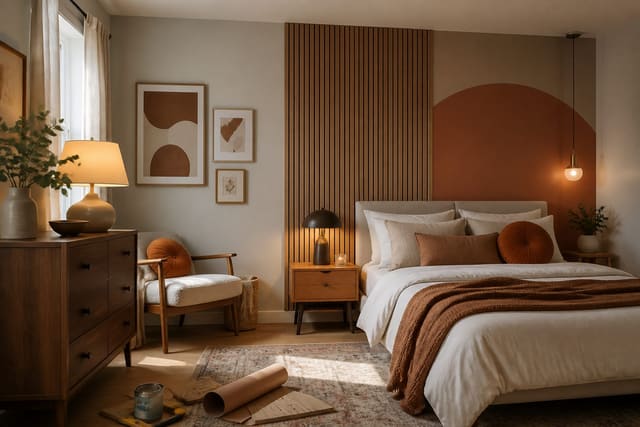
The second fix is materials. Matte finishes hide imperfection while glossy finishes broadcast every brush stroke, so a flat or eggshell paint flatters a DIY vase far more than a high-shine coat. Quality also hides in the small upgrades: a fabric-covered mat instead of a paper one, a real wood frame instead of plastic, felt pads under a tray. When you are building a corner around a project, the rules in our guide to decorating a corner help you layer height and texture so the DIY piece anchors the space instead of floating in it.
DIY projects that punch above their cost
These are the projects with the best ratio of effort to impact. Each one is finishable in a single session, and none requires a saw or a sewing machine. Work down the list and pick the two that fit your room:
- Build a framed art grid: hang six to nine matching frames in a tight rectangle with a consistent 2 to 3 inch gap, using free printable art or fabric swatches inside.
- Make no-sew pillow covers with fabric glue and a folded envelope back, swapping seasonal fabric over an existing $5 insert.
- Paint thrifted vases and bottles in one matte color, then cluster three at varied heights for a designed vignette.
- Apply peel-and-stick wallpaper to a single wall or the back of a bookcase for $40 to $120, lining up the pattern at each seam.
- Style a shelf in layers: stack books horizontally as risers, lean one piece of art, and add a plant so nothing sits in a flat row.
- Build an upholstered headboard from a plywood panel, 2 inch foam, batting, and fabric, attaching it to the wall for $80 to $150.
Notice the through-line: every project leans on repetition, a single color story, or careful alignment. The headboard and the wallpaper deliver the biggest visual change for the room, while the pillows and painted vases are the low-stakes wins you can finish before dinner. If you want the single highest-impact DIY of the bunch, a painted or paneled feature wall earns it, and our DIY accent wall ideas walk through the board-and-batten, color-block, and peel-and-stick versions with the exact measurements that keep the lines crisp.
Tools, finishes, and the details that sell the look
A short kit covers nearly every project here. A 24 inch level, a tape measure, painter's tape, a foam roller, and a hot glue or fabric glue gun handle the bulk of the work, and the total kit runs about $40 if you own none of it. The foam roller matters more than people expect, since it lays paint flat and avoids the brush marks that give a homemade vase away. Painter's tape gives you the crisp edges that make a two-tone wall or a striped tray look machine-cut.
Finish choices carry the most weight. Matte and eggshell paints forgive uneven hands; metallic spray in thin coats reads as a $50 store object on a $3 thrift find. For the headboard, a tight pull on the fabric and staples spaced every 2 inches keep the surface drum-flat instead of puckered. A reading corner is one of the best places to test these skills, and our reading nook ideas pair a DIY headboard or shelf with the lighting and seating that make the spot work. Measure twice, commit to one palette, and the finished room will not announce that you made it yourself.
Spend a little extra on the parts the eye lands on and save on the parts it never sees. A $4 pack of nice frames undermines an art grid, while a $12 wood frame sells it, so put your money into the frames, the hardware, and the visible fabric rather than the backing or the filler. For the no-sew pillows, a $9 yard of real linen reads as expensive while a slick polyester gives the project away the moment light hits it. Round corners get rough on a DIY project, so a few felt pads, a strip of edge banding on a raw plywood headboard, and a coat of matte sealer on a painted vase are the unglamorous steps that push the whole thing from craft project to finished decor. None of these adds more than a few dollars, and together they are the difference an observer cannot name but always notices.
Preview your DIY decor in Re-Design
Frequently Asked Questions
How do I make a DIY gallery wall look professional?
Use frames that share one finish, keep a consistent 2 to 3 inch gap between every frame, and choose generous mats so the art has room to breathe. Lay the whole arrangement on the floor first and adjust spacing before a single nail goes in. A tight grid of six to nine matching frames reads far more polished than a scattered mix of sizes.
What DIY decor projects are best for renters?
Peel-and-stick wallpaper, no-sew pillow covers, and styled shelves are all renter-safe since they leave no permanent marks. Peel-and-stick paper covers an accent wall for $40 to $120 and removes cleanly at move-out. Command strips let you hang an art grid or a lightweight headboard panel without drilling, so you take the whole look with you.
Can I paint thrift store vases and ceramics?
Yes, and it is one of the cheapest upgrades available. Clean the piece, prime it, then use two to three thin coats of matte spray or acrylic in a single color so the set looks intentional. Group an odd number at different heights, since a matte finish in one shade turns mismatched castoffs into a vignette that looks bought as a set.