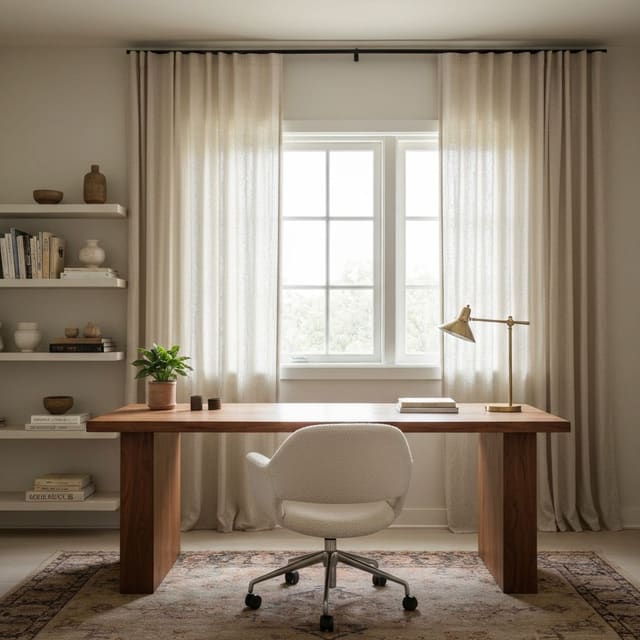
A home office cleans up cables in under 90 minutes when the plan commits to four moves — one under-desk cable tray to hold the power strip and dangling slack, J-channels along the desk edge to corral cables to the tray, hook-and-loop ties bundling each cable run, and a single labeled plug per device — chasing zip-tied perfection takes hours; the 90-minute system gets 90 percent of the result. Cables make a home office look messy faster than almost anything else, because they sit exactly where your eye lands: behind the monitor, under the desk, beside the outlet, and across the floor. My strongest opinion is this: do not buy a prettier desk until you have controlled the cords. A gorgeous workstation with a power strip dangling underneath still reads unfinished. The fix is not hiding every wire forever; it is deciding which cords need to move, which cords can vanish, and which access points must stay easy on a normal workday.
How do you hide cables in a home office?
You hide cables in a home office by giving power a planned route: mount cords under the desk, bundle only the cables that travel together, run raceways down the wall or desk leg, and keep the power strip off the floor. The goal is not a sterile showroom desk; the goal is a workstation where the computer, monitor, lamp, charger, and router can function without turning the room into a tangle.
Start at the outlet, not at the monitor. If the outlet is behind the desk, use a short, flat plug extension and mount a surge protector to the underside or back modesty panel of the desk. Leave at least 3"–4" between the power strip and any drawer box so plugs have room to turn without getting crushed.
For a sit-stand desk, every cable needs a vertical travel path. Raise the desk to its highest position, then add 6"–8" of slack before fastening anything. If you organize cords while the desk is low, the first standing adjustment can yank a monitor lead or charger from its port.
Separate cables by behavior. Monitor, webcam, and keyboard cords can live in one sleeve because they move together. Laptop chargers, phone cords, and headphones need more access, so they belong in clips, grommets, or a shallow charging drawer. Bundling everything into one thick snake looks tidy for a day and becomes annoying the first time you unplug one device.
Which cable route should your desk use?
The right cable management solutions office workers actually keep are the ones that match the desk shape, outlet location, and how often the equipment changes. A wall-facing desk can hide more than a floating desk. A rental corner with one outlet needs a different plan than a built-in office with floor power.
An under-desk tray is the best first purchase for most setups. Choose a metal or rigid plastic tray at least 16"–24" long, deep enough to hold the power strip and excess cord loops. Mount it 2"–3" back from the front edge so knees do not hit it, and keep the switch side of the power strip reachable. If the desk is thin, use short screws that will not punch through the top, or use a clamp-on tray instead.
Cable sleeves work well when cords travel horizontally. Use a 1"–1.5" diameter sleeve for a monitor, laptop dock, speaker pair, and lamp lead; anything fatter can look like a vacuum hose under a small desk. Black sleeves disappear under dark desks, while white or gray sleeves usually look better against pale walls and white laminate tops.
Raceways are for visible vertical runs. If a cord must drop from desktop height to an outlet, use a paintable wall raceway or a desk-leg channel rather than letting it hang loose. A 1/2"–3/4" wide raceway is enough for one or two cords; wider channels are better behind monitors, routers, or printers. In a rental, use removable adhesive only after testing a hidden 2" strip for 24 hours, especially on old paint or textured walls.
Grommets are worth adding when you own the desk or can drill a replaceable top. A 2" round grommet handles monitor and keyboard cords neatly, while a larger 3" opening helps when a dock, microphone, and multiple USB leads need to pass through. Renters should skip drilling into landlord-owned built-ins and use rear clips, clamp trays, or a desk that already has a cable port.
If the office is squeezed into a bedroom, dining corner, or alcove, pair the cord plan with the layout advice in compact home office planning. Cable control gets much easier when the desk is not fighting a door swing, radiator, or walkway.
Test this on your own room photo with ReDesign before you choose the final direction; keep the doorway, walls, windows, main furniture, lighting, and awkward fixed features visible so the preview solves the room you actually have.
What should stay accessible, and what should disappear?
A good desk setup hides visual noise without hiding the things you touch twice a day. The mistake is treating every cord as equally ugly and equally permanent. A monitor cable can vanish for months; a phone charger cannot.
Keep permanent cords on the slow route. Monitor power, display cable, desk lamp cord, speaker power, ethernet, and docking station leads can run through trays, sleeves, clips, and raceways. Label both ends with small tags if two black cords look similar. A 1/2" label near the plug saves crawling under the desk later when the internet drops before a meeting.
Keep daily charging on the fast route. A phone cable, tablet charger, camera battery charger, or headphone cable should land at the desktop edge, in a drawer, or on a small charging shelf. Use adhesive cable clips spaced 6"–8" apart along the back edge so the cord head cannot fall behind the desk. If the desktop is only 20"–24" deep, clips matter even more because loose cords steal the surface you need for notebooks and coffee.
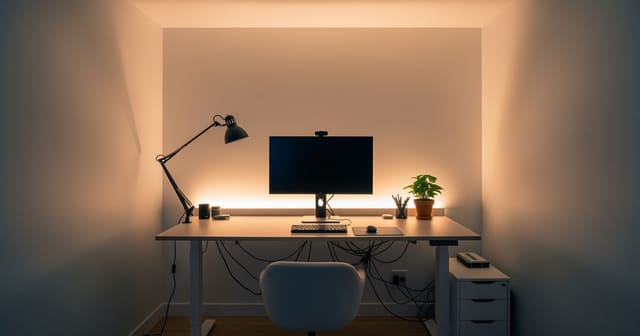
Do not ignore lighting cords. A task lamp should plug into the mounted strip, then run down the rear leg or through the tray instead of crossing the floor. Use warm bulbs around 2700K–3000K for a calmer office at night, and position the lamp cord on the same side as the outlet when possible. If glare and shadows are part of the problem, solve the lamp placement with this guide to home office lighting for focus before locking all the cords in place.
Printers, routers, shredders, and speakers need their own rules. A printer shoved under a desk can create a cable nest and steal legroom; leave roughly 18"–24" of knee clearance where your chair actually sits. Routers should not be buried behind a metal cabinet or inside a closed drawer. If the modem corner is ugly, use a ventilated box or low cabinet with an open back rather than suffocating the equipment for the sake of a cleaner photo.
Common home office cable management mistakes
The first mistake is mounting the power strip where you cannot reach it. A strip hidden perfectly behind a drawer is not a solution if you have to crawl on the floor to reset it. Mount it under the rear edge, side apron, or back panel with the switch and main plugs visible from the chair side.
The second mistake is over-bundling. One sleeve for every cable seems tidy until one charger fails, one monitor changes, or one device needs to travel. Bundle by destination: screen cords together, charging cords separately, lighting on its own path. Leave a small service loop of 4"–6" near the computer or dock so ports are not under tension.
The third mistake is letting cords cross chair paths. Any cable on the floor between the outlet and the chair will be kicked, rolled over, or pulled loose. If a floor run is unavoidable, use a low-profile cord cover rated for foot traffic and place it against a wall or baseboard. A cable protector in the center of the office makes the room feel temporary and creates a trip point.
The fourth mistake is using adhesive as if every surface is trustworthy. Adhesive clips can fail on dusty laminate, raw wood, textured paint, or the underside of a desk that has silicone polish on it. Clean the surface, let it dry, press firmly, and avoid loading a tiny clip with a heavy power brick. For heavier runs, use screw-in clips on furniture you own or clamp accessories that do not depend on glue.
The fifth mistake is hiding heat-producing equipment too well. Power bricks, laptop docks, routers, and chargers need air. Do not pack them into a closed box with no vent holes. A ventilated tray, open-back cabinet, or perforated metal basket is safer and usually looks more intentional than a sealed decorative box with warm electronics inside.
The sixth mistake is solving only the close-up view. Cable management should look clean from the doorway, from the seated position, and from the video-call angle. Stand 6'–8' back and check what you can still see: dangling cords under the desktop, black plugs against a white wall, or a power strip glowing on the floor. Those are the pieces to fix next, not the invisible knot already hidden in the tray.
For very small rooms, cords also affect perceived space. A clean floor line makes the office feel wider, especially when the desk shares a wall with storage or a bed. The same discipline used in small home office space ideas applies here: protect the walking path, keep the wall plane calm, and avoid equipment that spreads sideways without a reason.
Use AI design to preview your cable-free office before you stick anything down
AI design is useful for home office cable management because cord problems are spatial before they are decorative. Upload a straight-on photo of the desk wall, then a second photo from the doorway so the outlet, desk legs, monitor, chair path, lamp, printer, and floor are visible together. Do not clear the office into a fantasy version first; leave the dock, charger, router, and cable pile visible if they are part of the real problem.
Preview several practical versions. Try an under-desk tray with a wall raceway, then a rear-mounted power strip with desk-leg channels, then a floating shelf for the router, then a charging drawer or desktop dock. Keep the same desk, wall color, outlet location, and equipment in the prompt so the image tests organization rather than inventing a new room.
Look for the version that makes the cords disappear without making daily work harder. The winning concept should tell you where the power strip sits, which cords run together, where the vertical drop happens, how much floor stays clear, and which chargers remain reachable. If the preview only works because it removes the printer, changes the outlet, or erases the laptop charger, treat it as a mood image rather than an installation plan.
Turn the best image into a shopping brief before buying anything: tray length, raceway width, sleeve color, clip spacing, grommet size, surge protector location, and whether adhesive is safe for your wall or desk. That is how hide cables desk setup advice becomes a room that still functions on a busy Thursday.
Frequently Asked Questions
What is the easiest cable management upgrade for a desk?
A clamp-on under-desk cable tray holds the power strip and absorbs cable slack in 10 minutes — every dangling cable below the desk goes up into the tray and the floor stays clear for chair rolling. Use the room photo to compare the visible layout and fixed constraints before committing, because door swings, windows, outlets, storage reach, circulation, and existing furniture decide whether the idea survives daily use.
How do I hide cables running to the monitor?
Route monitor cables through a monitor arm channel or along the back of the desk and down a single hidden cable spine to the under-desk tray; let one visible cable run be planned, not five accidental ones. Keep the preview honest by leaving the problem area visible in the frame, then compare one conservative version against one bolder version before you buy lighting, paint, furniture, or storage.
Should I use zip ties or hook-and-loop?
Hook-and-loop ties (Velcro-style) for bundles you adjust often, zip ties only for permanent runs you never touch — zip ties on devices you reconfigure annually creates more work, not less. Check the result against ordinary movement first: drawer clearance, chair pullout, walkway width, glare, switch access, and sightlines matter more than a perfect catalog angle.
How do I cable manage if the desk floats in the room?
Run a single power cord down one leg with a cable wrap, then drape the cord 6in above the floor to a wall outlet; floating desks usually look worse with under-desk trays because the tray reads from every direction. Use the image to narrow priorities and measurements before ordering anything custom; final purchases still need real dimensions, outlet locations, installation limits, and product clearances.
Is wireless charging worth it for cable management?
Yes for phone and earbuds — a single charging pad eliminates 2 to 3 micro-USB or USB-C cables from the desktop; not yet practical for laptops, where wired charging still wins on speed. If the preview invents architecture or hides the awkward feature you need solved, rerun it with stricter instructions so the result remains tied to your actual room.
Three transformations to try
- Under-desk cable tray with bundled lines
- Monitor arm with channel-routed cables
- Floating desk with single-leg cable wrap