A kitchen home bar works when it has its own 24 to 36 inch zone of countertop, a dedicated 15 inch undercounter ice maker or wine fridge, and one upper cabinet with glass doors for glassware — without dedicated wet, cold, and display zones, the bar steals counter from cooking and never feels finished. A kitchen can absolutely moonlight as a home bar, but only if the bar behaves like a service station, not a tray of bottles shoved beside the toaster. My opinion is firm: the best kitchen bar area design gives drinks their own address so guests stop standing in front of the refrigerator while you cook. You add a bar area to a kitchen by grouping bottles, glassware, tools, lighting, and a small prep surface into one zone that supports drinks without interrupting the main cooking triangle. The trick is deciding what deserves counter space, what should hide, and what needs power or water before you buy a single cute decanter.
"A home bar belongs in the kitchen when one small zone gets a clear job and the rest of the counter is protected."
What makes a kitchen bar station work without a separate room?
A kitchen bar station works when it has a clear service zone, at least 24 inches of usable counter, nearby glass storage, and enough separation from the cooktop, sink, and refrigerator path that a guest can pour a drink without becoming an obstacle.
Think of the bar as a tiny hospitality machine. It needs a landing spot for bottles, a place to mix, a place to set down two or three glasses, and a way to clean sticky tools afterward. If the kitchen is small, the zone may be only one lower cabinet and one upper shelf. If the kitchen is larger, it might become a full beverage wall with a wine fridge, coffee gear, and closed storage for party supplies.
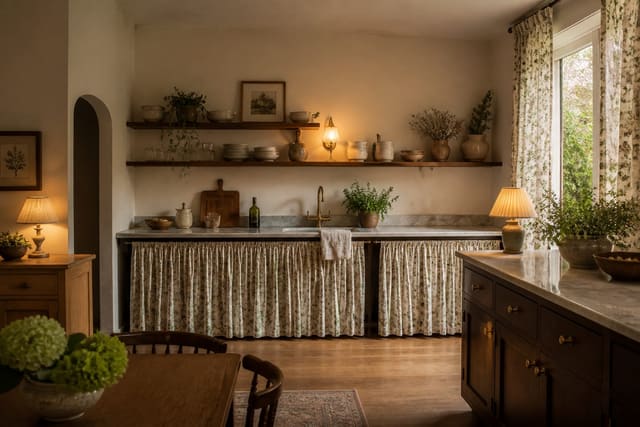
The best location is usually at the edge of the kitchen, not in the center of prep. Look for the end of a cabinet run, a short wall near the dining table, the side of a pantry, or an unused desk niche. A 30- to 36-inch-wide cabinet bay can hold a surprisingly complete drinks station if the shelves, tray, and lighting are planned together.
Match the bar mood to the kitchen you already have. A soft, collected kitchen can borrow restraint from cottagecore kitchen ideas: a skirted lower shelf, unlacquered brass, warm wood, and glassware that looks used rather than staged. The point is not to build a themed pub inside your kitchen; it is to make the drinks moment feel native to the room.
The counter, sink, and appliance decision that decides the whole plan
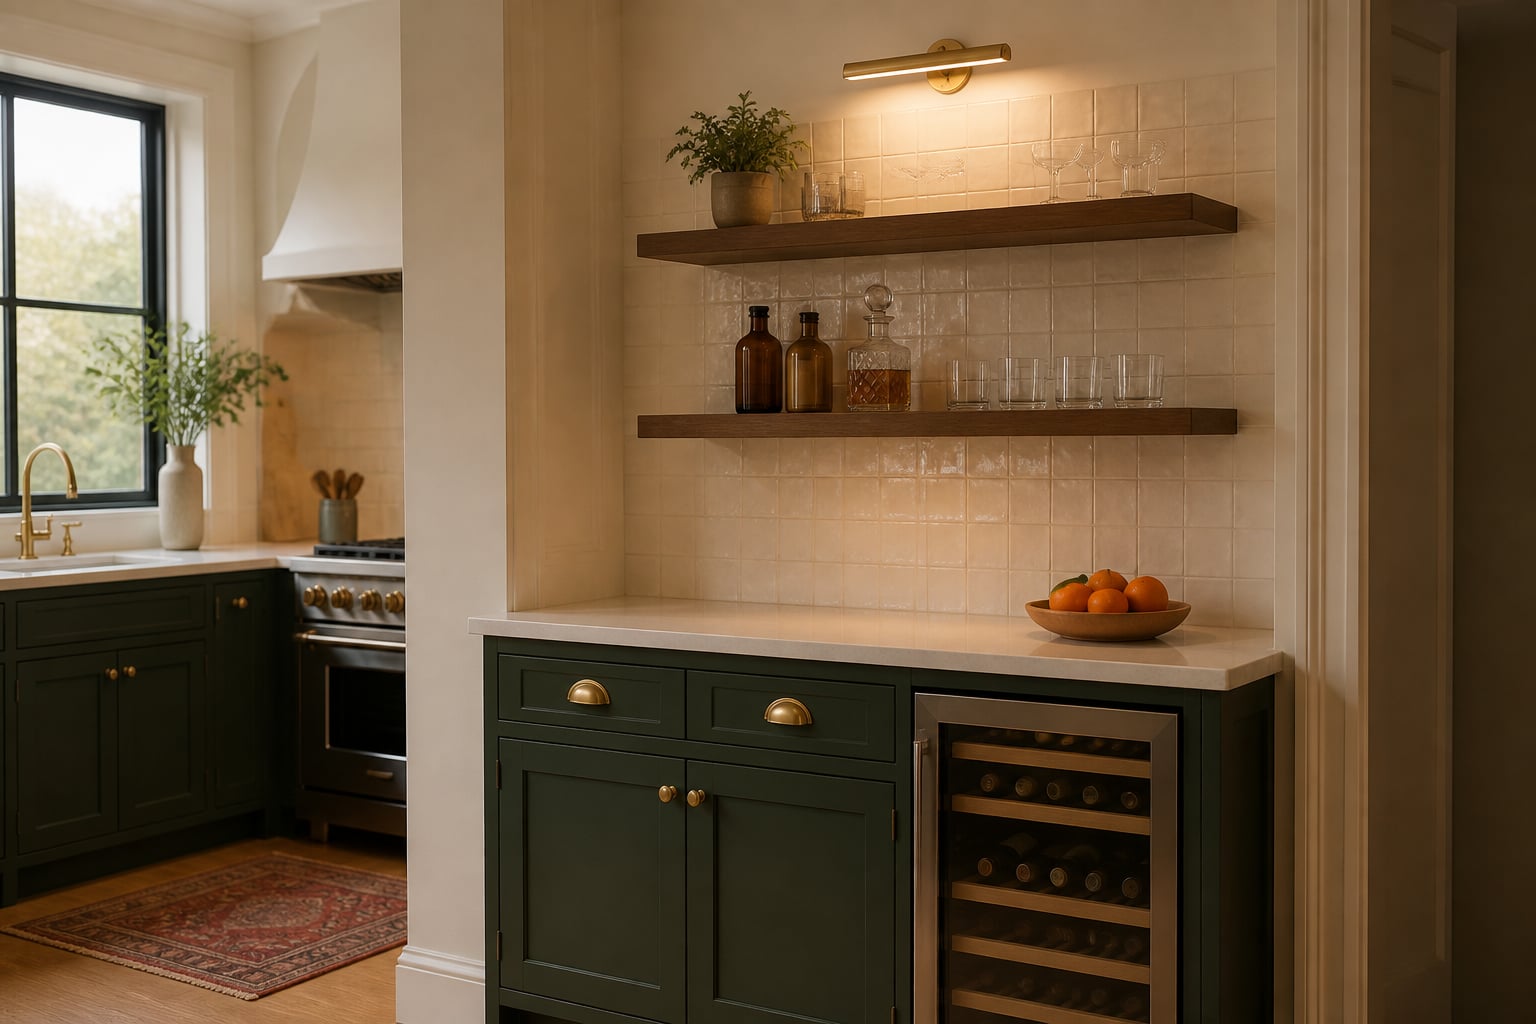
The first real choice is whether your kitchen bar is dry, wet, or appliance-led. A dry bar uses existing plumbing elsewhere and focuses on counter, storage, and lighting. A wet bar adds a sink. An appliance-led bar gives priority to a beverage fridge, wine column, ice maker, or coffee machine.
For most homes, a dry bar is the smarter default. It costs less, works in rentals, and does not require opening walls. Give it 24 to 36 inches of counter, a tray for bottles, a small cutting board, a citrus bowl, and a drawer for openers, stirrers, napkins, and coasters. If you entertain often, a 42-inch counter stretch feels less cramped because a bottle, shaker, ice bucket, and glasses can all sit down at once.
A wet bar earns its keep only when the sink is genuinely convenient. If the new sink sits three steps from the main kitchen sink, skip it and spend the money on storage, lighting, and a better counter surface. If the bar is across the room, near a dining area, or beside an outdoor door, a small sink around 15 to 18 inches wide can be useful for rinsing tools, filling an ice bucket, and dumping melted ice.
Appliances need ruthless planning. A beverage fridge is typically 24 inches wide, though compact 15-inch models can fit smaller runs. Leave the manufacturer’s required ventilation clearances, check the door swing, and make sure the handle does not collide with an island stool. A wine fridge under a sunny window is a poor bargain, no matter how sleek it looks.
Lighting is not decorative here; it is functional. Use undercabinet lighting around 2700K to 3000K so labels, garnishes, and glass rims are visible without making the bar feel like a lab. If the bar sits under open shelves, hide an LED strip toward the front underside of the shelf so the light washes the counter instead of glowing in your eyes.
Test this on your own room photo with ReDesign before you choose the final layout; keep the room structure, daylight, ceiling line, and main path visible so the preview solves the space you actually have.
Where should bottles, glassware, and tools actually live?
A useful home bar kitchen integration starts with frequency. Daily glasses and coffee mugs deserve the easiest shelf. Special glassware, extra bottles, and entertaining pieces can sit higher, deeper, or behind doors. If every object is treated like display, the kitchen will look busy even when it is clean.
Use closed lower storage for visual clutter. Liquor bottles, mixers, paper cocktail napkins, bottle bags, extra tonic, and awkward seasonal pieces rarely look calm together. A lower cabinet with pullout trays or a drawer stack keeps the bar efficient without turning the kitchen into a retail shelf. If bottles are tall, measure them before choosing interior fittings; many spirits need 12 to 14 inches of clear height.
Open shelves work best for glassware and a few beautiful bottles, not the full inventory. Keep shelf depth around 8 to 10 inches for glasses so the wall does not feel heavy. Install shelves with the lowest shelf roughly 16 to 18 inches above the counter; lower than that crowds the mixing surface, higher than that makes everyday glasses annoying to reach.
If your taste leans theatrical, edit even harder. A dramatic kitchen can take cues from maximalist kitchen ideas, but the bar still needs hierarchy: patterned tile, jewel-toned cabinets, or sculptural shelves can star, while most tools stay hidden. Maximalist does not mean every bitters bottle gets a spotlight.
Glass doors are a middle ground when you want display without dusting open shelves every week. Fluted or reeded glass is especially forgiving because it suggests sparkle while blurring the clutter of mismatched stems. For renters, a freestanding cabinet, wall-mounted rail, or bar cart parked at the end of the kitchen can create the same zone without permanent cabinetry.
Common kitchen bar area mistakes
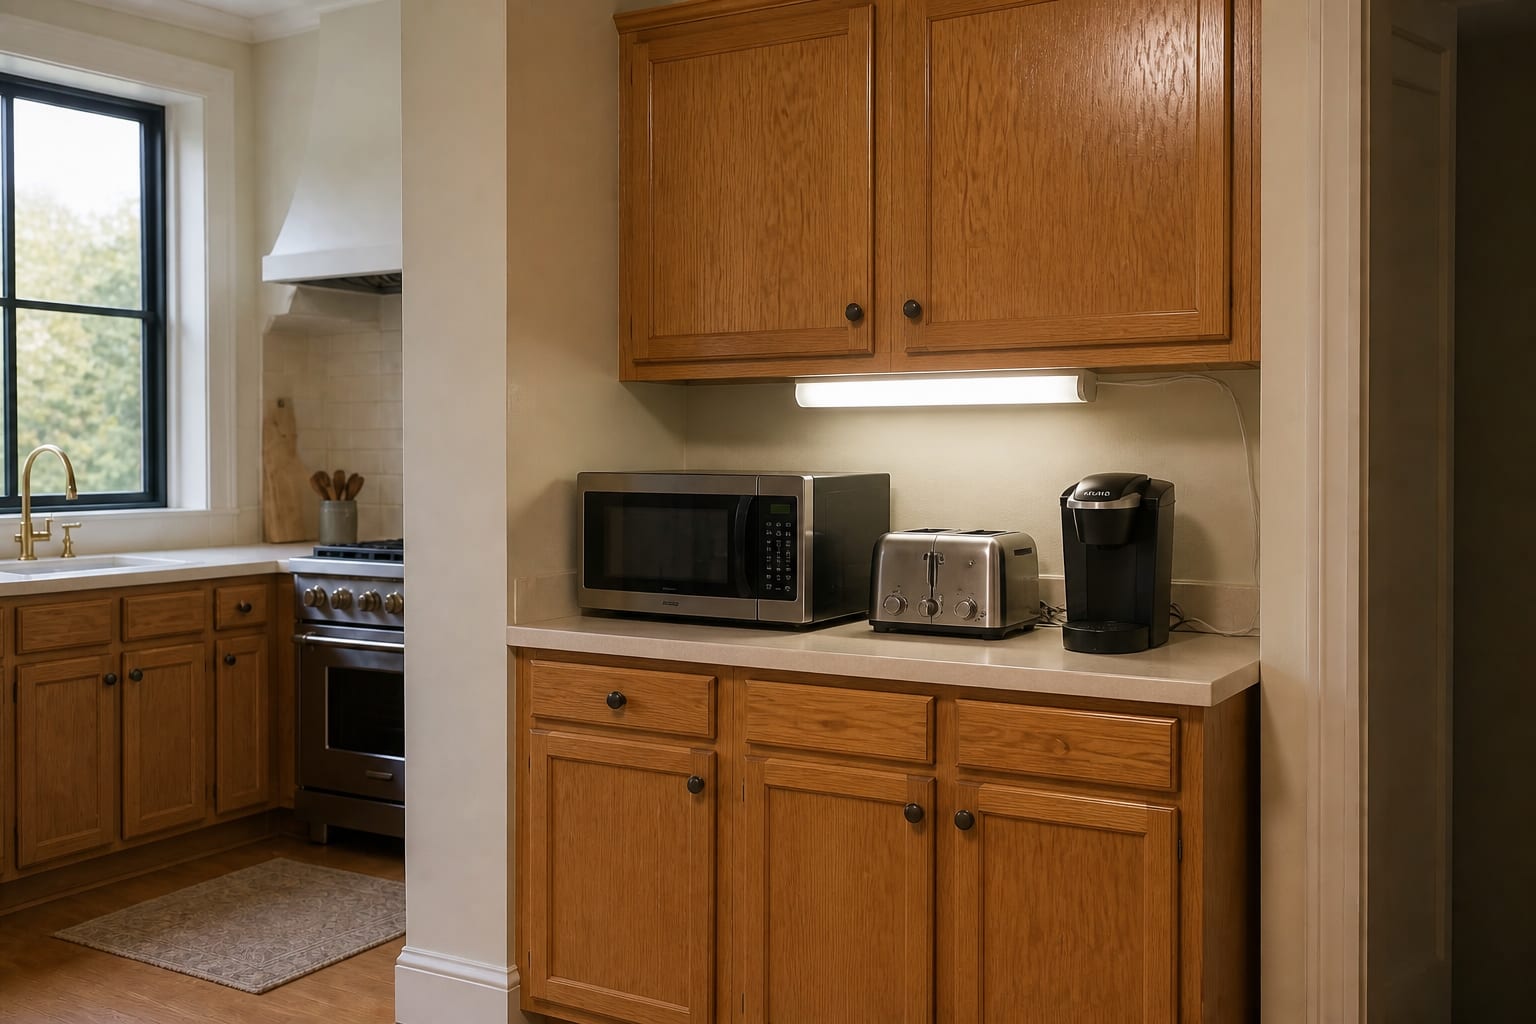
The first mistake is putting the bar in the busiest stretch of counter. If the drinks station sits between the range and sink, guests will reach for glasses exactly where knives, hot pans, and dirty prep bowls are moving. Shift the bar toward the perimeter, even if that means using a narrower cabinet run.
The second mistake is making every bottle visible. A counter full of liquor can look fun for one party and chaotic every morning after. Keep the active three to six bottles out if they are beautiful and used often; store the rest behind doors, in a pantry, or on a pullout shelf.
The third mistake is skipping a landing surface. A wine fridge with no counter beside it forces people to set glasses on the floor, island, or nearest mail pile. Even a 18-inch stone remnant, butcher-block top, or tray on a cabinet gives the station a working pause.
The fourth mistake is choosing finishes that fight the kitchen. Black metal, brick tile, and exposed shelving can be excellent in the right room, especially if you like the harder edge of industrial kitchen design ideas. They look fake when dropped into a delicate white kitchen with no other metal weight. Repeat at least one existing finish: cabinet color, hardware tone, counter material, wood species, or tile shape.
The fifth mistake is ignoring kids, pets, and morning routines. If children can reach the bottles, use locking lower storage or move alcohol higher. If a dog bowl already lives near the cabinet end, do not put glassware above the splash zone. If the same counter holds the coffee maker at 7 a.m., separate coffee tools from cocktail tools with trays, drawers, or shelf levels so the morning does not feel like cleanup from the night before.
Use AI to preview your kitchen bar station before you commit
Use AI design to preview the kitchen bar station because drinks stations are easy to over-style and hard to judge from cabinet drawings. A shelf that looks elegant on a mood board may crowd a window. A dark tile backsplash may make the whole cabinet run feel heavy. A beverage fridge may break the rhythm of painted doors once you see it at room scale.
Upload a clear photo of the kitchen from a corner or doorway so the cabinet run, island, refrigerator, sink, and dining connection are visible. Leave the real appliances, stools, pet bowls, small appliances, and outlet plates in the image. A fantasy-clean counter will give you a fantasy bar.
Test three controlled versions. Try a dry bar with shelves and a tray, a beverage-fridge version with closed storage above, and a wet bar version only if plumbing is plausible. Keep the wall color, flooring, and main cabinet style steady while you compare, because the question is where the bar belongs and how much visual weight it can handle.
Prompt for practical constraints, not just a prettier kitchen: 30 inches of service counter if possible, warm undercabinet lighting, glass storage within reach, closed lower storage, a beverage fridge door that clears the walkway, and no guest traffic through the cooking zone. Then look at the preview the way you actually live. Can someone pour wine while another person drains pasta? Does the bar still look calm when the coffee maker stays out? Does the station feel like part of the kitchen rather than a party prop?
The winning design should make hosting easier on an ordinary Friday, not just prettier for one holiday. When the drinks zone has a counter, light, storage, and a sane location, the kitchen can serve dinner and cocktails without asking the same square foot to do both jobs at once.
For the broader upload workflow, use the AI design complete guide as the parent checklist, then return to this room-specific pass for scale, light, and layout choices.
Frequently Asked Questions
How much counter space does a home bar need?
Plan for 24 to 36 inches of clear bar counter plus 15 inches of refrigeration or ice; a 60 inch run with a sink, glass display cabinet, and undercounter ice is the most common 'feels finished' size. Use the room photo to compare the visible layout and fixed constraints before committing, because doors, windows, storage, outlets, and traffic paths decide whether the idea survives daily use.
Do I need a separate sink at a home bar?
A bar sink is optional in an open-plan kitchen if the main sink is within 6 feet; in a closed-off butler's-pantry or basement bar, a small 12 by 15 inch bar sink keeps cocktail work out of the cooking zone. Keep the preview honest by leaving the problem area visible in the frame, then compare one conservative version against one bolder version before you buy materials or furniture.
What is the right fridge for a kitchen home bar?
A 15 inch undercounter beverage center holds wine and cans, an ice maker handles 25 lbs/day for entertaining, and a 24 inch dual-zone unit covers both for households that host monthly or more. Check the result against ordinary movement first: chair pullout, walkway width, door swing, glare, storage reach, and evening light matter more than a perfect catalog angle.
Where should I store spirits and glassware?
Keep spirits at adult-eye level in a closed upper cabinet, glassware in a glass-door cabinet directly above the bar counter, and tools in the top drawer of the bar run; mixers and bitters live in a pull-out shelf below. Use the image to narrow priorities and measurements before ordering anything custom; final purchases still need real dimensions, code checks, outlet locations, and product clearances.
Does a home bar add resale value?
A built-in bar adds modest value in higher-end markets and minimal value in starter markets; the resale lift is largest when the bar uses cabinetry that matches the kitchen and avoids 'man-cave' finishes that buyers want to rip out. If the preview invents architecture or hides the awkward feature you need solved, rerun it with stricter instructions so the result remains tied to your actual room.
Three transformations to try