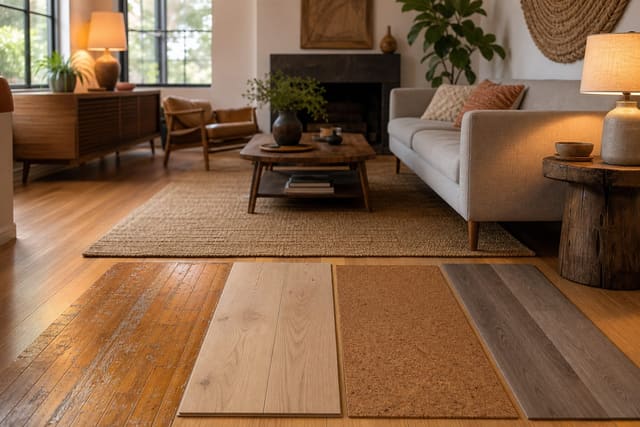
Mixed flooring transitions look intentional when the seam follows an architectural line (doorway threshold, end of kitchen counter, change in ceiling), the height step is under 1/4 inch (or a transition strip bridges it), and the two materials sit in the same warm/cool undertone family. Mixed flooring is not the problem; sloppy transitions are. My rule is strict: a floor change should either disappear quietly or look deliberately framed, never like the installer ran out of material at the doorway. Tile against wood, vinyl against carpet, and two different plank floors can all work if the height, break line, and strip profile are decided before the last cuts are made. This guide shows how to turn an awkward floor transition between rooms into a clean design decision.
How do you handle flooring transitions between different floor types?
You handle flooring transitions between different floor types by matching the finished floor heights, placing the break at a logical threshold, and choosing a strip profile that protects both materials without becoming the main feature. The strip is not decoration first; it is a small construction detail that keeps edges from chipping, carpet from fraying, and toes from catching.
Start with height. If the two floors finish within about 1/8 inch of each other, a flat metal, wood, or vinyl T-molding can usually bridge the seam cleanly. If the difference is closer to 1/4 inch or more, use a reducer that slopes from the higher floor to the lower one. Once the height change reaches roughly 1/2 inch, treat it as a real step and make the transition wider, lower contrast, and easier to see.
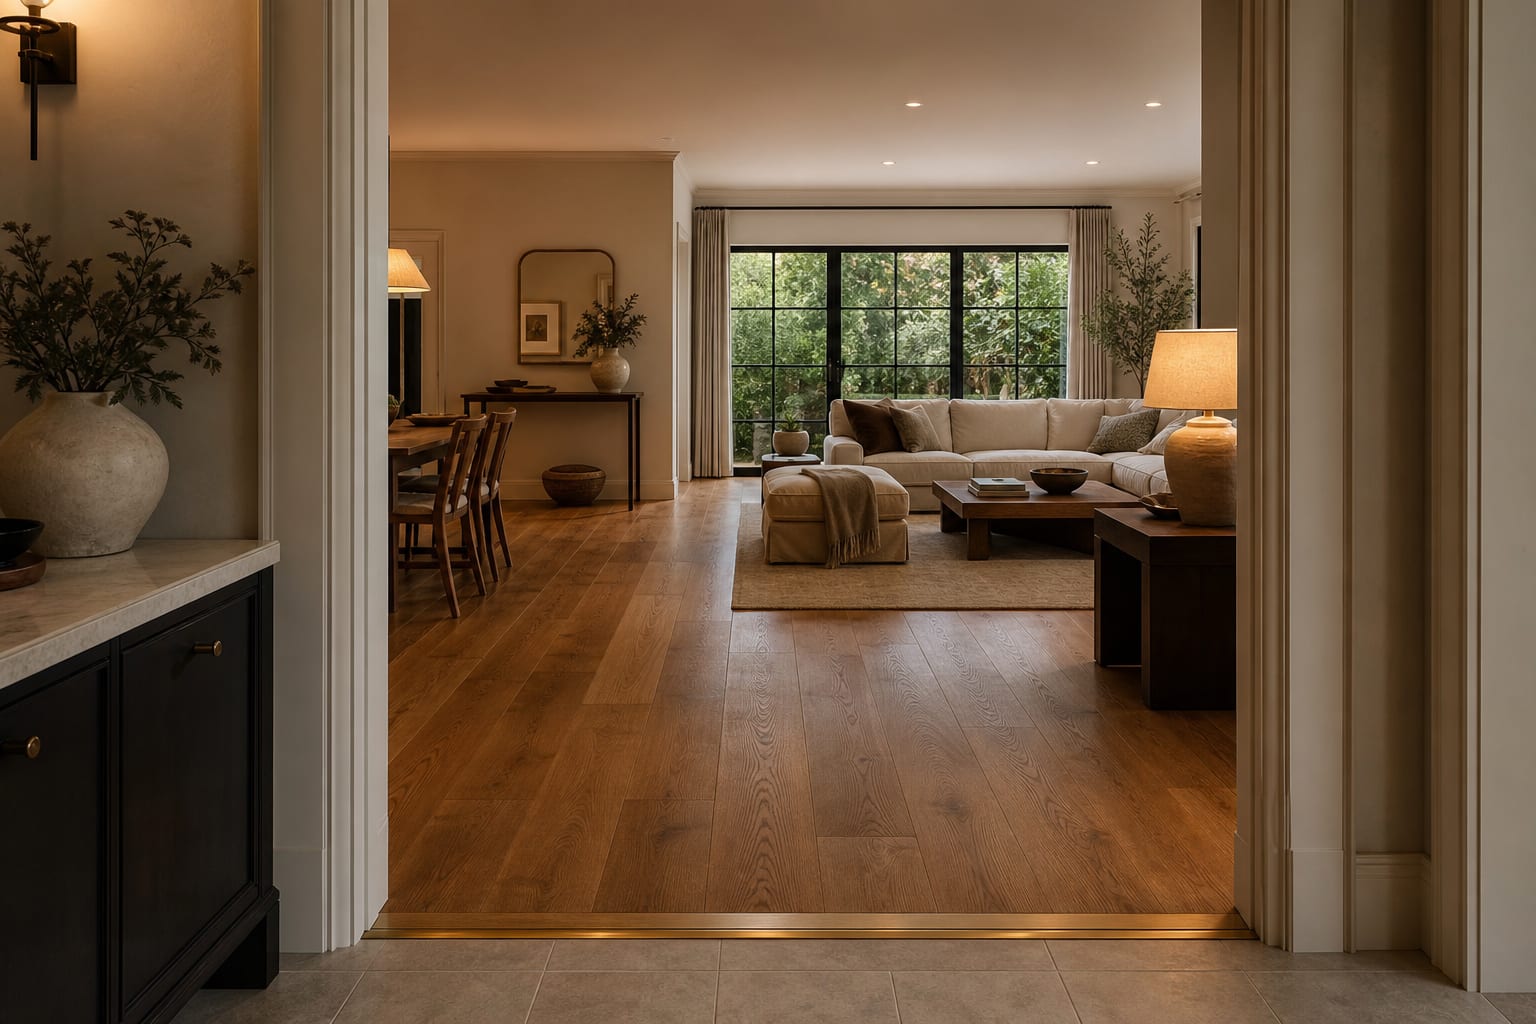
Then decide where the material should change. In a doorway, the break usually belongs directly under the closed door, centered between the jambs, so neither room visually borrows the other room’s flooring. In an open plan, the break should line up with architecture: the end of a cabinet run, a beam, a cased opening, a stair edge, or the back of a kitchen island. A random line across open floor almost always looks like a budget compromise.
Where should the strip go when rooms meet awkwardly?
The best transition location is the place where the eye already expects a pause. Doorways are easiest because the casing creates a natural frame. Measure between the jamb faces and aim to center the strip under the door slab, not proud of one side. If the door swings over the transition, check clearance with the finished strip installed; even a low reducer can scrape if the door was already close to the tile.
Open-plan rooms need more discipline. When mixed flooring open plan layouts change from kitchen tile to living room wood, line the seam with the outer edge of the cabinets or island rather than the exact point where spills might happen. A kitchen floor that extends 6–12 inches past the cabinet face can protect the work zone, but a tile field that wanders halfway into the sofa area makes the living room feel smaller.
Direction matters too. If wood or vinyl planks run into tile, avoid a thin sliver of plank at the edge. Keep cut pieces at least 2–3 inches wide when possible, and move the seam slightly if that prevents a fragile strip. In homes with several entries, the planning is similar to fixing a room with too many doorways: every opening needs a clear route, not a separate little flooring accident.
For hallways, keep the main walking path calm. A high-contrast metal strip every few feet can chop the floor into bands. If three rooms meet at one spot, choose one dominant flooring direction and let the smaller rooms transition off it. The eye forgives a practical threshold; it does not forgive a pinwheel of materials.
Test this on your own room photo with ReDesign before you choose the final direction; keep the doorway, walls, windows, main furniture, lighting, and awkward fixed features visible so the preview solves the room you actually have.
Which transition strip works for tile, wood, vinyl, or carpet?
Choose the profile by material and height, not by the prettiest sample in the aisle. A flush saddle, T-molding, reducer, end cap, or carpet bar each solves a different edge problem. The wrong one can make expensive flooring feel temporary.
- Use T-molding when both floors are nearly level. The center stem drops into the gap, and the top cap bridges both edges. Leave the expansion gap required by the flooring manufacturer, often about 1/4 inch for floating planks, instead of pinching the floor tight under the strip.
- Use a reducer when one floor is higher. Tile often sits above vinyl or older hardwood because of mortar, backer board, or previous layers. A reducer should slope gradually enough that a bare foot does not notice it before the eye does; wide reducers usually look better than narrow steep ones.
- Use a Schluter-style metal edge at tile when the tile side needs protection. This is especially clean at bathrooms, mudrooms, and kitchens. Match the finish to nearby hardware if you can: brushed nickel near chrome plumbing, brass near warm cabinet pulls, black only when black is repeated elsewhere.
- Use a carpet transition bar when carpet needs to be stretched or tucked. Do not trap carpet under a random flat strip and hope it behaves. Carpet has tension, pile height, and backing thickness; a proper tack strip or clamp profile keeps the edge from curling.
- Use stained wood only when it truly relates to the wood floor. A mismatched oak strip between walnut-look vinyl and porcelain tile is not neutral. If you cannot match the species or stain, a quiet metal profile may look more honest.
Color is part of the decision. A bright silver strip across dark floors draws attention to every tiny height change. A matte bronze, satin nickel, blackened metal, or stained wood can disappear better depending on the palette. In darker rooms, flooring transitions also affect how light moves; if the new material dulls the space, pair the floor plan with lighting tricks for darker rooms before deciding the darker option is worth it.
Common mixed flooring transition mistakes
The most common mistake is treating the strip as a cover-up for bad planning. A transition strip can protect an edge, but it cannot make an off-center break line look intentional. Before installation, snap a chalk line or tape the seam on the floor and view it from the room entry, sofa, sink, and hallway.
Another mistake is ignoring finished height until the last day. Tile plus mortar can be much taller than 5–8 mm luxury vinyl plank. Hardwood may need underlayment, while floating floors need room to move. Build a sample stack with every layer included: subfloor, membrane, mortar, tile, pad, plank, adhesive, and the transition profile.
Do not run two wood-look floors into each other unless the contrast is deliberate. A gray oak vinyl against a warm oak laminate usually looks like a failed match, not a layered material palette. If the tones are close but not identical, add a clean threshold in metal or stone so the change reads as a decision.
Avoid tiny diagonal seams. Diagonal transitions can work in patterned tile entries or historic homes, but most modern rooms look cleaner with a straight break aligned to architecture. If the seam must angle because of stairs or an odd wall, make the strip long enough to feel structural, not like a leftover cut.
Skipping light checks is another quiet failure. Glossy tile beside matte wood can flash under afternoon sun, and a pale reducer beside dark planks can look wider than it is. Use the same thinking you would use with mirrors that amplify light: reflection can clarify a room, but it can also point straight at a flaw.
Use AI design to preview the floor change before you commit
Floor transitions are hard to judge from samples because the problem is rarely just the strip. The real question is whether the break line, material color, plank direction, rug placement, and doorways all make sense together. An upload-and-preview tool lets you test those relationships before a contractor cuts tile or orders reducers.
Take a straight photo from the room entry, then another from the adjoining room. In the prompt, name the materials and the exact transition: a kitchen with warm white tile meeting medium oak planks at the island edge, a slim brass reducer, planks running lengthwise toward the windows, and no raised threshold in the main walkway. Then run a second version with the flooring break centered in the doorway and a third with the same floor continuing through.
Compare the previews for alignment, not fantasy styling. Does the transition make the kitchen look planned, or does it shorten the living area? Does the strip color relate to cabinet hardware, door hinges, lighting, or nothing at all? For renters, preview peel-and-stick tile meeting existing laminate, low-profile rubber reducers, and rugs placed to soften the change. For owners, test permanent tile edges, flush wood saddles, and wider reducers before the finish floor is locked in.
The preview will not certify subfloor flatness or code requirements. It will show whether the transition is visually worth doing, and that is a decision many people skip until the floor is already installed.
What final checks make the transition feel intentional?
Stand on both sides of the threshold and look down from normal walking height. If the strip is the first thing you see, either the contrast is too high, the placement is wrong, or the adjacent materials are fighting. A good flooring transition strip idea should help the floors meet; it should not become the loudest line in the room.
Walk the route barefoot. You should not feel a sharp lip, a rocking strip, or a hollow click. Keep main circulation at least 30 inches wide around the transition, and wider if it sits near a kitchen, entry, laundry room, or wheelchair route. Check robot vacuums, stroller wheels, pet bowls, bath mats, and doors before calling the project finished.
Repeat one finish nearby so the transition has company. A brass strip can relate to cabinet pulls, a black metal edge can relate to a stair rail, and a wood saddle can relate to trim or flooring. Two or three small echoes are enough. The goal is not to hide that the floor changes; it is to make the change look designed, safe, and calm.
Frequently Asked Questions
Where should a flooring transition go?
Always at a doorway, archway, counter end, or change in room function — never in the middle of an open floor plane; mid-room transitions read like a mistake regardless of material choice. Use the room photo to compare the visible layout and fixed constraints before committing, because door swings, windows, outlets, storage reach, circulation, and existing furniture decide whether the idea survives daily use.
Do I need a transition strip between hardwood and tile?
Yes when the height difference is more than 1/4 inch or the two materials need expansion space; T-molding or reducer strips in a matching wood tone are the standard solution. Keep the preview honest by leaving the problem area visible in the frame, then compare one conservative version against one bolder version before you buy lighting, paint, furniture, or storage.
Can I transition without a metal strip?
Yes when the two materials are the same height and one (usually the tile) gets a flush-set border row at the doorway; this is the cleanest look but requires precise install. Check the result against ordinary movement first: drawer clearance, chair pullout, walkway width, glare, switch access, and sightlines matter more than a perfect catalog angle.
Should the two floors have similar tones?
They should sit in the same undertone family (both warm or both cool); clashing undertones make the transition look accidental even when the seam is clean. Use the image to narrow priorities and measurements before ordering anything custom; final purchases still need real dimensions, outlet locations, installation limits, and product clearances.
Does AI preview floor transitions before commit?
Yes — upload photos of both rooms and the transition zone, and AI previews material pairings and transition placement before any install. If the preview invents architecture or hides the awkward feature you need solved, rerun it with stricter instructions so the result remains tied to your actual room.
Three transformations to try
- Hardwood to tile at kitchen doorway
- LVP to tile at bathroom doorway
- Carpet to hardwood at bedroom threshold