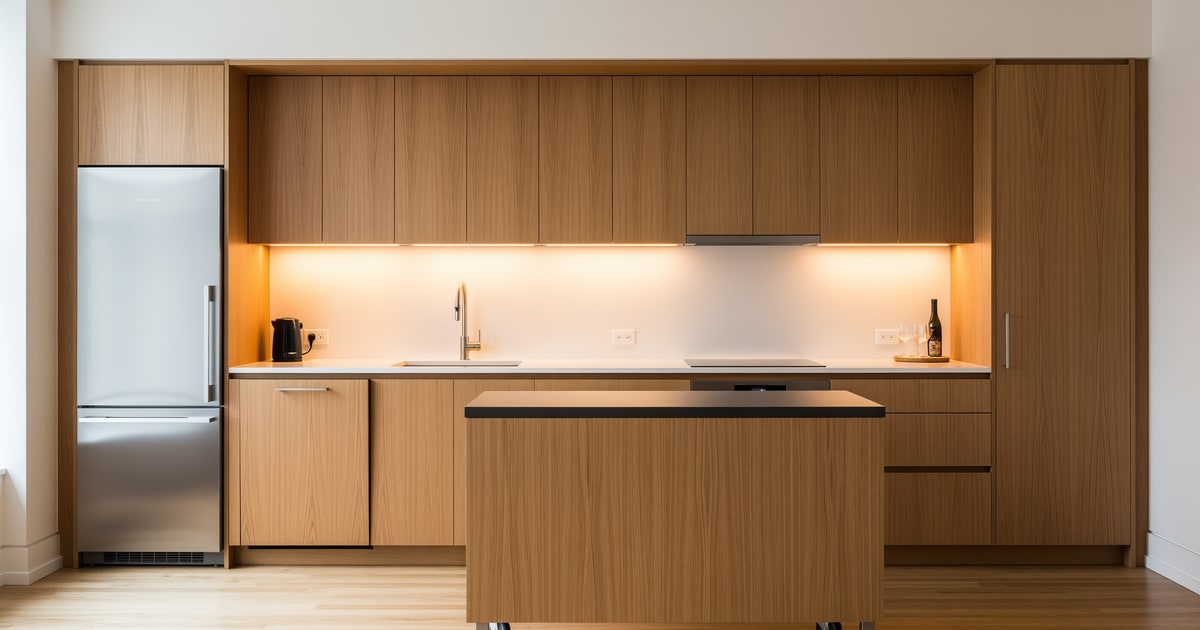
One-wall kitchens read functional when the run is at least 10 feet, the work triangle (fridge, sink, stove) sits within 8 feet end-to-end, upper cabinets go to the ceiling for storage, and a movable island or peninsula extends prep zone without blocking egress. A one-wall kitchen is the most efficient kitchen layout in existence when designed correctly — and one of the most dysfunctional when treated like a kitchen that ran out of room. Every element, from the order of appliances to the height of the upper cabinets, either solves the core problem (limited counter space and storage) or makes it worse. The good news: the one-wall kitchen has a clear, repeatable design formula. Follow it and the layout works in 6 feet or 14 feet of wall space.
How do you design a one-wall kitchen to maximize space?
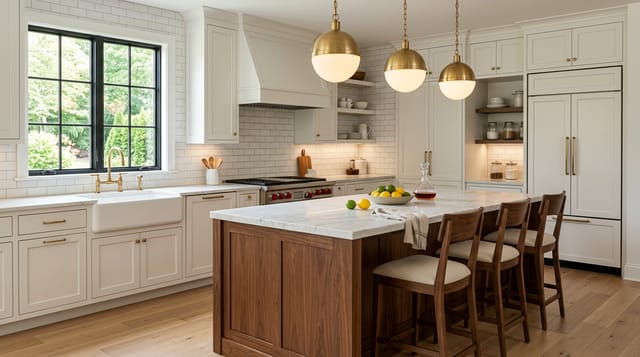
Work in the standard cooking triangle sequence — refrigerator, prep zone, sink, cook zone — from one end of the wall to the other. Put the refrigerator on the end closest to the room entry so it's accessible without walking through the cooking zone. Put the sink in the center with at least 24" of counter on each side. Put the stove or cooktop adjacent to the sink with at least 18" of counter between them. Go floor-to-ceiling with cabinets. Install under-cabinet lighting. Add one rolling island or a wall-mounted drop-leaf if the room allows.
The appliance sequence that makes a one-wall kitchen work
The sequence matters because in a one-wall kitchen, traffic flows in one direction. Anyone reaching into the refrigerator while someone else is at the stove creates a collision if the refrigerator is in the center.
- Refrigerator first (room-entry end). Accessible to guests and household members without entering the cooking zone. The refrigerator is also the tallest element — putting it on the end prevents it from interrupting the cabinet line in the middle.
- 24" prep counter after the refrigerator. This is where groceries land after unpacking, and where vegetables are cut before they go to the stove. Never put the stove directly adjacent to the refrigerator — the heat differential wears out both appliances.
- Sink at center. Double basin or single large-basin. The sink is the pivot point of the triangle; it needs counter on both sides.
- 18"–24" of counter between the sink and stove. This is the plating and prep zone. You'll use it constantly during cooking.
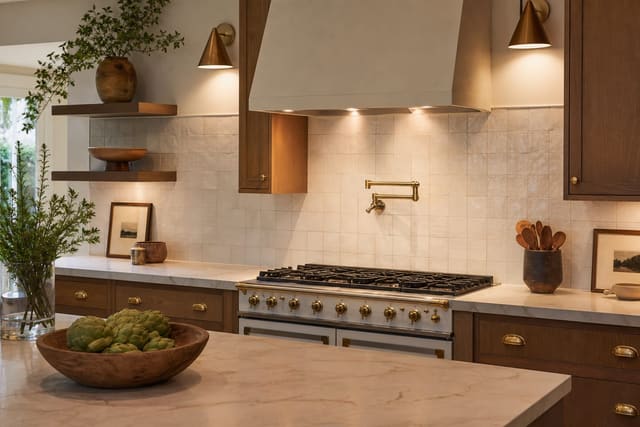
- Stove or cooktop last. Adjacent to the 18"–24" counter. If the stove is on the far end, the cooking zone is isolated from traffic.
- Dishwasher to the right of the sink (for right-handed users). The door swing must clear without blocking the adjacent counter.
Test this on your own room photo with ReDesign before you choose the final direction; keep the doorway, walls, windows, main furniture, lighting, and awkward fixed features visible so the preview solves the room you actually have.
Vertical storage: where one-wall kitchens gain their square footage back
In a one-wall kitchen, vertical storage above the counter is the entire pantry. Going short on upper cabinet height is the single biggest design mistake in this layout.
- Floor-to-ceiling cabinets everywhere possible. Standard upper cabinets stop at 84"–96" even in 9' rooms, leaving a 12" soffit gap. That gap is a full cabinet row of dry-goods storage — use it.
- Refrigerator-height cabinets above the refrigerator. A refrigerator panel cabinet (84"–96" tall) looks designed and provides three additional shelves of storage.
- Open shelving in the 12" gap above standard uppers if installing tall cabinets isn't feasible. Holds light-weight items and breaks up the cabinet line visually.
- Pull-out drawers in all base cabinets. Three-drawer bases instead of shelved bases recover the back 8"–12" of depth you'd otherwise lose to the back wall of the cabinet.
- Magnetic knife strip and pegboard at one end. Keeps knives and small tools off the counter.
- Under-sink storage maximized. A pull-out tray or stacked organizer under the sink recovers space most owners leave as dead storage.
Counter space maximization
Every inch of counter in a one-wall kitchen is premium real estate.
- Remove everything from the counter that doesn't get used daily. The coffee maker stays; the stand mixer goes on a pull-out shelf.
- Install an over-sink cutting board. Spans the sink and adds a full work surface at no counter cost.
- Add a rolling kitchen cart. A 24"x18" cart on locking wheels provides an additional prep surface and rolls against the wall when not needed. Parker Gwen, IKEA, and Amazon Basics all make functional versions under $200.
- Wall-mounted folding table if the room allows. At 36"–40" height, it serves as an additional prep surface or breakfast bar. Folds flat in seconds.
Visual strategies that make the layout feel larger
- Continuous backsplash from counter to ceiling. Uninterrupted vertical tile reads as one tall surface and makes the wall feel higher. Break it up with a shelf or cabinet and the room segments.
- Keep the cabinet run quieter than the wall around it. High-contrast cabinetry in a one-wall kitchen draws the eye to the end points of the room and makes the layout feel shorter.
- Under-cabinet lighting at 2700K. Lights the counter and makes the lower half of the room feel brighter and larger.
- One large-format tile on the floor (12"x24"+). Continuous flooring with minimal grout lines makes the room read wider.
Sequence is the layout. The cleanest one-wall run usually moves refrigerator, landing zone, sink, prep, cooktop, then another landing zone, even if each zone is compact. Try to keep 15 inches of counter on at least one side of the cooktop and 18 inches near the sink; without those landings, the kitchen becomes a line of appliances with nowhere to set anything down. Tall storage should sit at one or both ends so the middle stays visually open. The micro kitchen guide uses the same principle at smaller scale: every inch has to be assigned a job.
The finish pick is continuity. Flat-panel doors, integrated pulls, a single backsplash material, and cabinets to the ceiling make one wall feel designed rather than leftover. If you want contrast, put it on the lower cabinets or the backsplash, not every surface. Owners should prioritize full-extension drawers, a panel-ready dishwasher if budget allows, and under-cabinet lighting before decorative open shelves. Renters can use a rolling island only if it parks outside the work triangle; otherwise it becomes an obstacle. For color decisions, kitchen cabinet colors is the safer place to test white oak, warm white, or green before the single wall gets visually heavier.
Common one-wall kitchen mistakes
- Refrigerator in the middle. Creates a traffic collision every time someone reaches in while the cook is at the stove.
- Standard-height upper cabinets that leave 12" of dead space above. The biggest storage loss in the layout.
- No counter between stove and sink. Forces plating on a cold burner.
- Busy backsplash in a small room. Pattern overload in a narrow one-wall kitchen reads claustrophobic.
- No secondary surface. Even a rolling cart solves the counter-shortage problem at a fraction of the cost of new cabinetry.
- Using every inch for tall storage. A one-wall kitchen still needs open counter. Too much vertical cabinetry can make the kitchen efficient on paper and frustrating in real use.
- Breaking the run with too many materials. A tiny backsplash change, open shelf, and contrast cabinet can chop one wall into five smaller pieces.
Use AI design to preview your one-wall kitchen configured correctly
Moving from the wrong appliance sequence to the right one is a cabinet and plumbing decision that's hard to reverse. AI design lets you photograph the existing kitchen and preview the refrigerator-left, sink-center, stove-right sequence with ceiling-height cabinets in place — before you hire a contractor. The preview is what makes the $2,000 decision feel like a $200 one.
Frequently Asked Questions
Is a one-wall kitchen functional for daily cooking?
Yes when the run is at least 10 feet and the fridge-sink-stove placement keeps the work triangle under 8 feet; shorter runs require careful storage edits but still cook well. Use the room photo to compare the visible layout and fixed constraints before committing, because door swings, windows, outlets, storage reach, circulation, and existing furniture decide whether the idea survives daily use.
Should one-wall kitchens have an island?
A movable island or peninsula adds prep zone and seating without doubling the floor footprint; fixed islands work only when the kitchen has at least 12 feet of opposing clearance. Keep the preview honest by leaving the problem area visible in the frame, then compare one conservative version against one bolder version before you buy lighting, paint, furniture, or storage.
Where should the fridge go in a one-wall kitchen?
At one end of the run so it does not break the counter prep zone in the middle; counter-depth fridges read cleaner in a one-wall layout than standard-depth. Check the result against ordinary movement first: drawer clearance, chair pullout, walkway width, glare, switch access, and sightlines matter more than a perfect catalog angle.
How tall should the upper cabinets go?
To the ceiling — every inch of vertical storage matters in a one-wall kitchen; the gap above standard 30-inch uppers wastes the most accessible storage in the room. Use the image to narrow priorities and measurements before ordering anything custom; final purchases still need real dimensions, outlet locations, installation limits, and product clearances.
Does AI preview one-wall kitchen layouts?
Yes — upload the kitchen wall photo and AI previews appliance placement, island options, and cabinet heights against the actual wall length. If the preview invents architecture or hides the awkward feature you need solved, rerun it with stricter instructions so the result remains tied to your actual room.
Three transformations to try
- One-wall kitchen with movable island
- One-wall kitchen with ceiling-height uppers
- One-wall kitchen counter-depth fridge