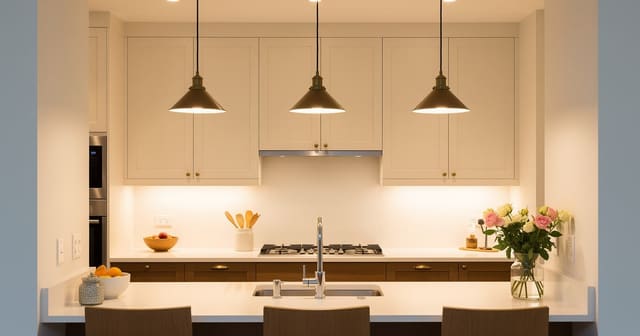
Kitchen task lighting works when undercabinet LEDs run continuous along the front edge of every upper cabinet at 3000K, pendants over the island hang 30 to 36 inches above the counter centered on the work zones (not centered on the island length), and the range hood light handles the cook zone — three independent task layers replacing the single shadow-casting overhead. Most kitchens have ambient light covered (recessed cans, a pendant or two) and zero task light placed correctly. The result: a kitchen that looks fine when you walk in and feels frustrating when you actually cook in it. Chopping, reading recipes, and finding things in the pantry all happen at counter height and below — but the lights are six feet above. Fix the task layer and the kitchen functions like a professional space at half the budget of new appliances.
Where should task lighting go in a kitchen?
Five places: under every upper cabinet, inside the range hood, over the sink, inside the pantry, and at the prep zone. Each one solves a specific frustration (shadows on the counter, dim cooktop, dark sink, hunting in the pantry, dim chopping zone). All at 2700K–3000K, all on dimmers, all with LED sources for heat and lifespan. Recessed cans alone are ambient lighting, not task lighting — they cast your own shadow onto whatever you're doing.
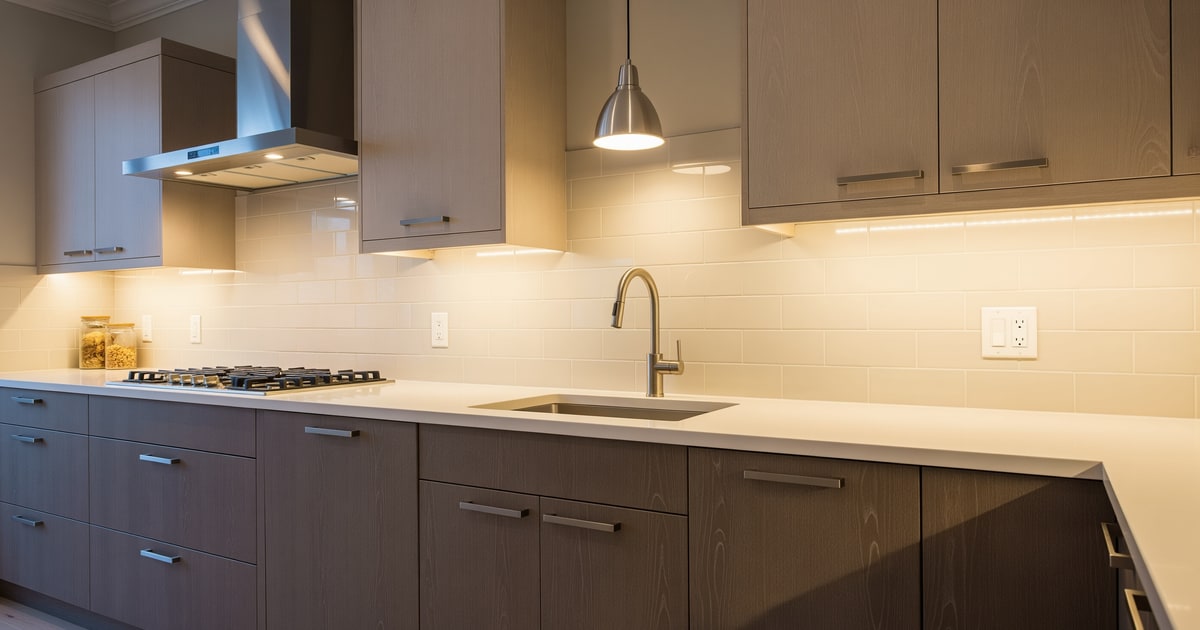
Under-cabinet lighting (the single highest ROI fix)
Under-cabinet lighting is the most impactful kitchen lighting upgrade per dollar. A continuous strip or row of pucks at 2700K transforms the counter from a dark cave into the brightest plane in the room.
- Continuous strip vs. pucks. Continuous LED tape provides even light with no hot spots — preferred. Pucks are cheaper but leave dim valleys between them.
- Mount toward the front of the cabinet underside, not the back. Front-mounted light hits the counter; back-mounted light hits the wall.
- Linear footage: cover at least 80% of the counter run. Skipping the section above the sink or stove leaves dark patches exactly where prep happens.
- Plug-in or hardwired. Plug-in (Phillips Hue Lightstrip, Sylvania, Ikea) works fine and installs in an afternoon. Hardwired is cleaner long-term.
- Cost: $80–$250 for plug-in, $400–$800 for hardwired with a switch.
- 2700K, dimmable. Cool-white tape (4000K+) makes the counter feel like an autopsy table.
Test this on your own room photo with ReDesign before you choose the final direction; keep the doorway, walls, windows, main furniture, lighting, and awkward fixed features visible so the preview solves the room you actually have.
Range hood lighting (the most-missed task layer)
Most stock range hoods come with a single weak halogen or LED that bathes the cooktop in cold light. The fix is one of two upgrades:
- Replace the stock hood bulb with a 2700K LED of the same socket type. Often a GU10 or G9. Five-minute fix. ~$15.
- Replace the hood entirely if you're already remodeling. Aim for a hood with two LED light bars at 2700K, dimmable, and at least 600 lumens combined. The cooktop becomes a stage.
Over-the-sink task light
The sink is where you prep produce, fill pots, and clean — and in 70% of kitchens it's lit only by ambient overhead, which means your body blocks the light when you're standing at it.
- Pendant centered over the sink if there's no upper cabinet above. 30"–36" off the counter to bottom of pendant, 2700K, dimmable.
- A small puck or strip under any upper cabinet adjacent to the sink if there's no overhead room.
- Even better: a small light inside a window-front sink frame (LED tape across the sill) for nighttime sink work.
Pantry and cabinet interior lighting
Walk-in pantry without light = food chaos. Pull-out drawer without light = mystery contents.
- Motion-activated puck lights inside the pantry door frame. $20 each, battery-powered, no electrical work. Snap on when the door opens.
- Strip lights inside drawers that you open every day. Battery, motion, 2700K. Disproportionate joy.
- Inside glass-front uppers, a single warm puck transforms display dishware into evening ambient lighting.
Prep-zone overhead task light
The dedicated prep zone — the 24" of counter where you actually chop — benefits from a direct light source that isn't ambient.
- A narrow-beam recessed can directly above the prep zone in addition to wider ambient cans. Or a pendant if there's no upper cabinet.
- Slightly cooler temperature is acceptable here only if isolated on its own switch. 3000K for prep is fine; never put it on the same switch as ambient or accent.
Under-cabinet light should wash the front half of the counter, where knives and prep bowls actually sit. Put LED tape or a low-profile bar 2 to 3 inches back from the cabinet face, not tight to the backsplash, and aim for 300 to 500 lumens per foot with 90+ CRI. 3000K is the safest kitchen temperature because it keeps food readable while still feeling warm next to wood and stone. Diffused covers are not optional; bare diode dots reflected in a polished counter make the kitchen feel cheaper. If the kitchen is dark overall, this is the first move from the dark kitchen guide because it proves how much of the problem is shadow.
The second product decision is control. A hardwired tape system on a wall dimmer is cleaner for owners, while renters can use rechargeable or plug-in bars with a hidden switch under the cabinet lip. At the range, choose a hood insert with real front-edge light rather than a decorative hood that leaves the burners dim. At the sink, a small flush mount or pendant centered over the basin is usually enough if it lands 30 to 36 inches above the work surface. Micro kitchens need the same discipline at smaller scale, which is why the micro kitchen design guide protects every lit inch of counter.
Watch the sink zone in open kitchens. Sinks are often placed under a window and then forgotten after sunset, leaving dishes and prep cleanup in silhouette. A small recessed adjustable, a slim pendant, or a low-glare surface mount centered over the basin solves the problem without adding visual weight. Keep the beam wide enough to hit both faucet and front counter edge; a narrow spotlight creates a pretty circle and still misses the work.
Finally, check how the light is switched during actual cooking. If the under-cabinet layer requires reaching behind a coffee maker or tapping three separate bars, it will be left off. Put the main task layer on one accessible control, then let specialty lights handle the range and sink.
Common kitchen task-lighting mistakes
- No under-cabinet lighting at all. The default in 60% of kitchens. The single biggest miss.
- Cool-white under-cabinet strips. Reads commercial.
- One pendant over the island with nothing else at counter level. Pendants are ambient, not task — body blocks the light when leaning over the island.
- Forgetting the sink and stove zones. The two most-used spots in the kitchen.
- All-recessed-can lighting. Cans are ambient. Task = counter level and below.
- No dimmer. Task lighting needs to dim for cleanup at night without overstimulating.
- Centering lights on the room instead of the work. A perfectly centered fixture can still leave the cutting board in shadow if your body blocks the beam.
- Mounting LED strips against the backsplash. That placement lights the wall beautifully and leaves the knife work happening in your own shadow.
Use AI design to preview the task-lit kitchen
It's hard to commit to under-cabinet strips, a new range hood, and a pendant over the sink without seeing the result. AI design lets you photograph your kitchen and preview it with full task lighting in place — alongside the current ambient-only version — in minutes. The visible difference makes the $300 install decision in an evening rather than a year of "I'll get to it."
Frequently Asked Questions
Where should undercabinet lighting go in a kitchen?
Mount LED strips at the front edge of upper cabinets (not the back wall) so the light reaches the counter without shadowing under the cook's hands; back-mounted strips light the backsplash, not the counter. Use the room photo to compare the visible layout and fixed constraints before committing, because door swings, windows, outlets, storage reach, circulation, and existing furniture decide whether the idea survives daily use.
How high should kitchen pendants hang above an island?
30 to 36 inches from the bottom of the pendant to the counter surface — close enough to feel intentional, high enough to clear sightlines and tall guests. Keep the preview honest by leaving the problem area visible in the frame, then compare one conservative version against one bolder version before you buy lighting, paint, furniture, or storage.
What color temperature for kitchen task lighting?
3000K for undercabinet and range hood (slightly cooler for color accuracy on food prep), 2700K for pendants and dining-adjacent lighting; mixed cool task and warm accent reads designed in kitchens. Check the result against ordinary movement first: drawer clearance, chair pullout, walkway width, glare, switch access, and sightlines matter more than a perfect catalog angle.
Do I need overhead lighting if I have undercabinet and pendants?
Yes — a single dimmable overhead handles cleaning and entertaining when all three task layers are on; skip the overhead and the room reads dim during whole-room work. Use the image to narrow priorities and measurements before ordering anything custom; final purchases still need real dimensions, outlet locations, installation limits, and product clearances.
What is the biggest mistake in kitchen task lighting?
Single overhead 4000K LED with no task layers — every counter is in shadow, every face under the cabinets is unflattering, and the room reads cold and clinical; three task layers fix this. If the preview invents architecture or hides the awkward feature you need solved, rerun it with stricter instructions so the result remains tied to your actual room.
Three transformations to try
- Undercabinet LED at front edge plus island pendants
- Range hood light plus undercabinet warm work zone
- Three-layer task plus dimmable overhead at full