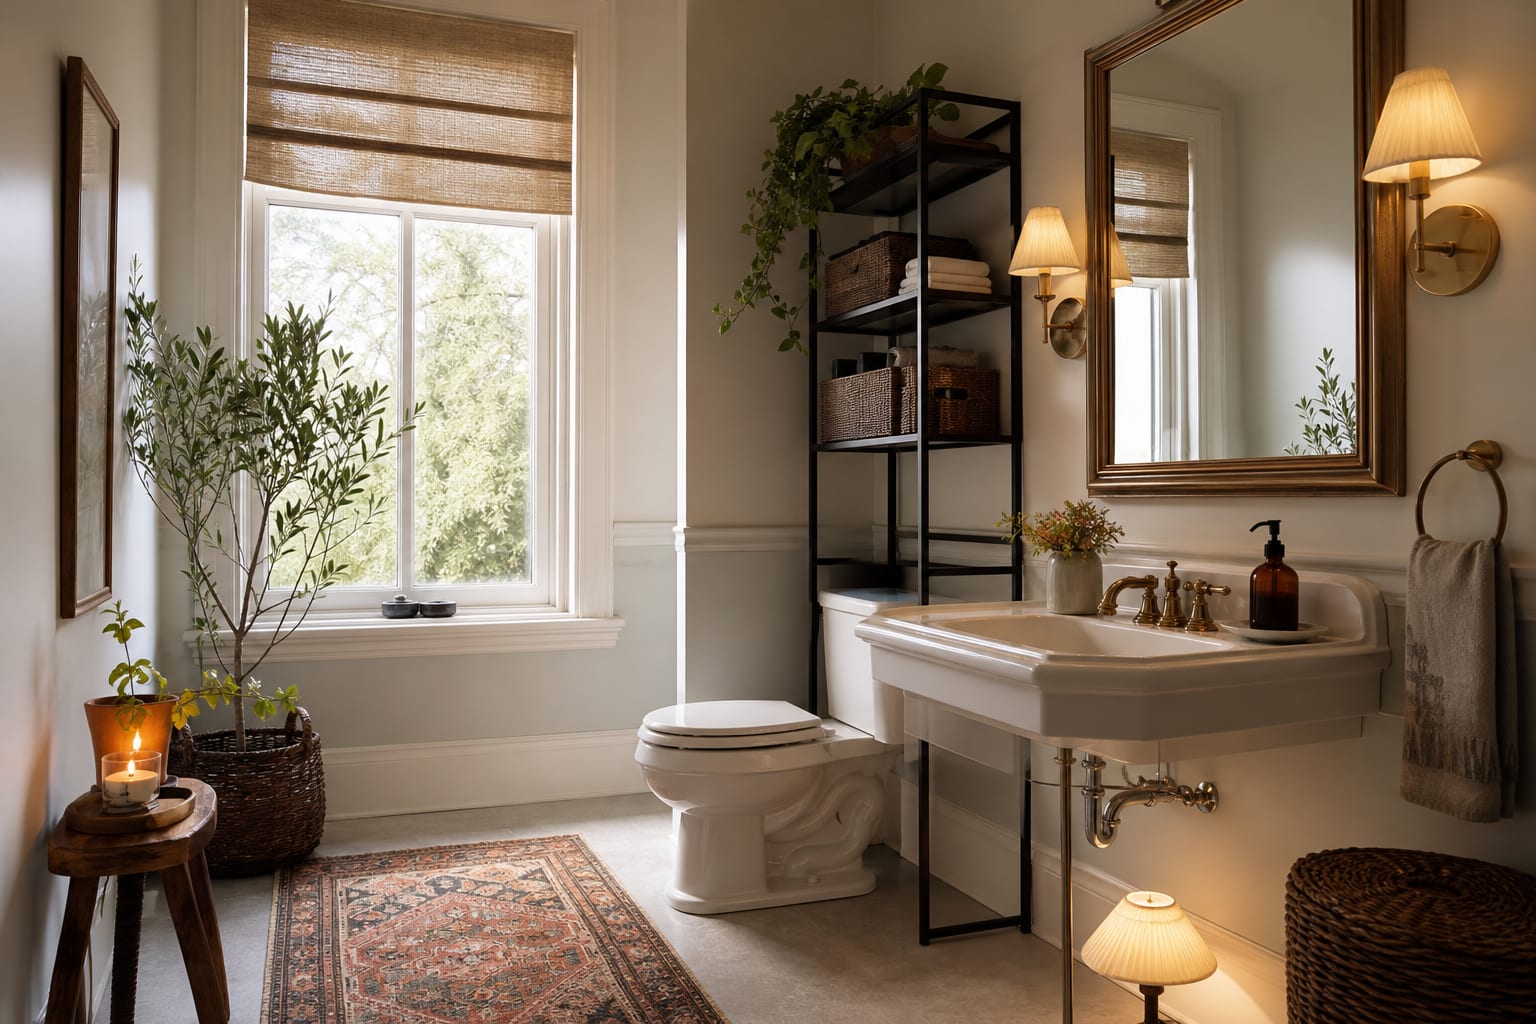
A rental bathroom upgrades under 200 dollars by swapping the showerhead (deposit the original), replacing the toilet seat, adding a new shower curtain on a tension rod, hanging a 30 by 36-inch leaning mirror, replacing the bath mat with a real Turkish cotton, and swapping the overhead bulb to a 2700K dimmable LED — every move reversible at move-out. A rental bathroom usually looks bad for boring reasons: yellow light, tired grout, a builder-grade mirror, exposed clutter, and one sad towel bar doing too much work. My strongest opinion is this: do not spend your $200 pretending you remodeled. Spend it making the parts you touch every morning feel cleaner, brighter, and more intentional, while every change stays removable. These rental bathroom makeover ideas focus on high-impact swaps that a landlord should never need to know about.
What improves a rental bathroom without renovating?
You improve a rental bathroom without renovating by changing the surfaces, lighting, storage, and textiles that can be removed cleanly at move-out. The best $200 plan is not a pile of cute accessories; it is a sequence that corrects the bathroom's biggest visual offense first.
Start with light if the room feels gray, green, or cave-like. Swap bulbs to 2700K–3000K, aim for a 60W–75W equivalent per shaded fixture, and avoid cool blue bulbs that make white tile look clinical. In a bath with no window, the same logic used to brighten a windowless bathroom applies: layer reflected light, keep the shower curtain pale, and remove anything that blocks the mirror.
Correct the mirror zone next because it is where you actually judge the room. A peel-and-stick frame kit, a slim medicine cabinet, or a better plug-in vanity light changes the wall you face twice a day. Keep the mirror width within about 2"–4" of the vanity width so it looks chosen instead of leftover.
Use textiles to hide the floor only after the lighting and mirror are handled. A 20" x 32" washable bath mat works for a single sink, while a 24" x 60" runner suits a narrow double-vanity bath. Leave at least 2" of visible floor at the baseboards so the rug looks deliberate, not crammed.
Which under-$200 upgrades should you buy first?
A strong renter-friendly bathroom upgrade starts with the items that change daily use, not the items that photograph well for five minutes. If the vanity area is the problem, spend roughly $40–$80 on lighting and mirror improvements before buying trays, candles, or decorative jars.
For the mirror, add a removable frame, a narrow picture ledge mounted into existing holes, or an adhesive metal trim that can be warmed and peeled later. If you use adhesive, test a hidden 2" square for 24 hours, especially on glossy paint or old plaster. Bathrooms are humid, and steam exposes bad adhesive faster than a dry hallway ever will.
For storage, choose one closed piece and one open piece. A 24"–30" over-toilet cabinet can hold backup paper, medicine, and cleaning bottles, while a 12"–16" tray on the vanity can corral soap and daily skincare. More open baskets usually create visual noise; the bathroom already has faucets, caps, labels, grout lines, and towel folds competing for attention.
For the shower, replace a thin liner and sagging curtain with a fabric-look curtain hung from a tension rod near ceiling height. A standard 72" curtain is fine for most tubs, but if the rod can sit higher, an extra-long 84" curtain makes a cheap tub wall feel taller. Choose white, oatmeal, stripe, or a small check before you choose a giant print.
Test this on your own room photo with ReDesign before you choose the final direction; keep the doorway, walls, windows, main furniture, lighting, and awkward fixed features visible so the preview solves the room you actually have.
How do you make temporary bathroom finishes look real?
Temporary bathroom improvements fail when they try to fake luxury too loudly. The safer move is to use removable finishes in small, believable areas: the back of an open shelf, the side of a vanity, the wall above a backsplash lip, or the floor only if the existing tile is truly dragging the room down.
Peel-and-stick floor tile should line up with the room, not just with the first wall you see. Dry-lay several 12" x 12" tiles before peeling backing, and check whether the pattern creates skinny slivers at the tub or doorway. If the last strip would be under 2", shift the layout so the cut pieces are shared on both sides.
Removable wallpaper can work above tile, but it needs breathing room. Stop it at a clean vertical edge, keep it at least a few inches away from the shower spray zone, and avoid dark paper in a tiny room with one weak fixture. If you are trying to make tile feel calmer, this guide on how to make small bathroom tile look bigger is useful before you cover anything.
Grout refresh pens are often more convincing than peel-and-stick drama. Clean the grout first, let it dry fully, then use a white or warm-gray pen only where the lines are stained, not across perfectly decent tile. A cleaner grid can make a dated bathroom feel maintained, which is usually more valuable than making it look fake-new.
Common mistakes that make a rental bathroom look cheaper
The first mistake is replacing every visible item in a different finish. Black hooks, brass shelves, chrome faucets, bamboo trays, and matte white containers can all be attractive alone, but together they make a small bathroom feel like a sample bin. Pick one metal to repeat near the sink and one warm texture for softness.
The second mistake is ignoring the vanity light. A pretty mirror under a harsh overhead bulb still gives you shadows under the eyes and a dull room in photos. If you can add plug-in sconces or swap shades without rewiring, place light near face height, roughly 60"–66" from the floor, and read this bathroom mirror lighting guide before buying a fixture that only lights the ceiling.
The third mistake is using spa styling in a bathroom with no closed storage. Rolled towels and clear jars look calm only when the ugly supplies have somewhere else to live. If the toilet paper, plunger, hair dryer, and stain remover are exposed, buy a closed cabinet before buying a eucalyptus bundle.
The fourth mistake is treating removable as risk-free. Adhesive hooks can pull weak paint, vinyl can trap moisture, and suction shelves can drop shampoo onto a tub at 2 a.m. Keep original hardware in a labeled bag, photograph the room before each change, and remove test pieces with a hair dryer and plastic scraper instead of a metal blade.
Use AI design to preview your bathroom before you spend the $200
AI design is useful for a rental bathroom because the budget is small and the tolerance for mistakes is smaller. Upload a straight-on photo of the vanity wall, then a second photo from the doorway so the shower curtain, floor, and storage are visible together. Keep the toilet brush, trash can, and daily products in the photo if they need to stay in real life.
Preview one change at a time before stacking them. Ask for warm vanity lighting with the same mirror, then a framed mirror with the same lighting, then a pale shower curtain, then a floor treatment. If the bathroom only looks good when the app changes the tile, vanity, mirror, faucet, and wall color at once, the concept is not renter-friendly enough.
Use the winning preview as a shopping filter. Match the curtain length, bulb warmth, storage height, rug size, and metal finish instead of chasing an exact product that may not fit your lease or your walls. The goal is a bathroom that looks calmer on Monday morning and still returns to its original state when you move.
Frequently Asked Questions
What is the highest-impact under-50-dollar bathroom rental upgrade?
A 2700K LED bulb swap in the overhead vanity fixture changes how every surface, towel, and face reads in the room — and reverses in 60 seconds at move-out. Use the room photo to compare the visible layout and fixed constraints before committing, because door swings, windows, outlets, storage reach, circulation, and existing furniture decide whether the idea survives daily use.
Can renters change the showerhead?
Yes — unscrew the original (no tools needed in most installs), store it in a labeled bag, and install a new fixed or handheld showerhead; reverse at move-out in under five minutes. Keep the preview honest by leaving the problem area visible in the frame, then compare one conservative version against one bolder version before you buy lighting, paint, furniture, or storage.
What single textile upgrade transforms a rental bathroom?
Swap the cheap polyester shower curtain for an 8-foot waterproof cotton or linen curtain on a wider tension rod; this single move pulls the eye up and reads like a designed bathroom on first glance. Check the result against ordinary movement first: drawer clearance, chair pullout, walkway width, glare, switch access, and sightlines matter more than a perfect catalog angle.
Should renters replace the toilet seat?
Yes — a 30 to 60-dollar slow-close white toilet seat installs in five minutes and reverses at move-out; original seats in rentals are often the worst-looking and worst-functioning piece in the room. Use the image to narrow priorities and measurements before ordering anything custom; final purchases still need real dimensions, outlet locations, installation limits, and product clearances.
How do I add storage to a rental bathroom without drilling?
Use a tension-pole corner shelf in the shower, a Command-hook hanging organizer behind the door, an over-the-toilet shelving rack that stands on the floor, and a slim freestanding rolling cart in any open corner — zero drywall damage. If the preview invents architecture or hides the awkward feature you need solved, rerun it with stricter instructions so the result remains tied to your actual room.
Three transformations to try
- Linen shower curtain on wide tension rod with 2700K bulb
- Handheld showerhead and white slow-close seat
- Over-toilet stand and tension corner shower shelf