Start with how you actually use the space after dark, then buy fixtures to match. To choose outdoor lighting for your home, decide what each zone needs first: a path needs low, glare-free light, an entry needs a clear pool of brightness, and a patio wants soft layers you can dim. My read is that most yards fail at night not because they lack fixtures but because every light is the same brightness pointed in the same direction.
I think the trick is restraint. Three well-aimed lights beat a dozen scattered ones, and the warmth of the bulb matters more than the number of lumens on the box. Get color temperature and placement right and even budget fixtures look intentional.
Match the fixture to the job
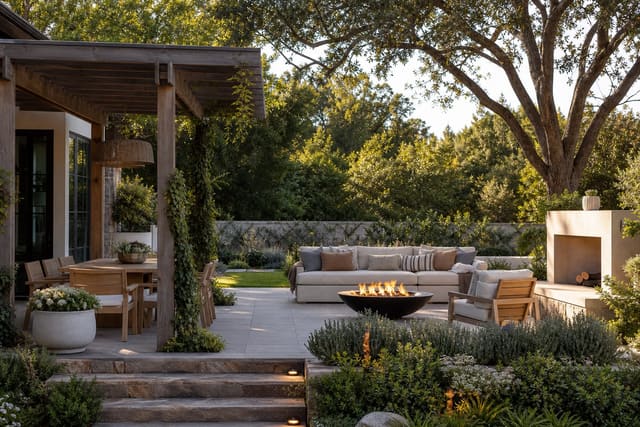
Every fixture type exists for a reason, and mixing them is what gives a yard depth. Path lights wash a soft circle onto walkways and bed edges. Spotlights throw a narrow beam to graze a tree trunk or a textured wall. Wash or flood lights cover a broad area like a garage face. Step lights tuck into risers so nobody misjudges a stair. Wall sconces flank a door at roughly 66 inches to center, sized about one-third the height of the door.
When I plan a yard, I sketch the zones I want lit and assign one fixture type to each. For a layered backyard scheme that balances seating, planting, and play areas, the same zoning logic in these AI backyard design ideas carries straight over to lighting. Decide the rooms of the yard first, then light each one for what happens there.
Think in three jobs rather than in fixtures. Ambient light fills a space gently so you can sit and talk; task light is brighter and focused where you cook, climb stairs, or open a gate; accent light is the decorative layer that picks out a tree, a wall, or a water feature. A patio usually needs all three, while a side path needs only one. Naming the job before you buy the fixture stops you from over-buying.
Lumens guide brightness, but outdoors you want less than you think. A path light at 80 to 120 lumens is plenty; a spotlight grazing a small tree might use 200 to 400, and a wall wash for a garage face around 700 to 1,200. Push past that and you flatten the very texture you were trying to show. Your eyes adapt to darkness, so a little warm light goes a long way once the sun is down.
Get color temperature and beam angle right
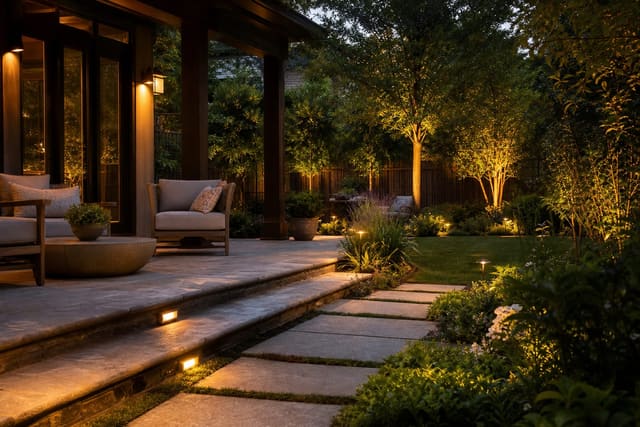
Color temperature, measured in Kelvin, is the single setting that makes lighting feel warm or clinical. Stay in the 2700K to 3000K range for anything near the house and seating. I reserve a slightly cooler 3500K only for security lighting where I want crisp visibility over ambiance. Anything labeled "daylight" at 5000K belongs in a workshop, not a garden.
Beam angle controls how tightly light is focused. A narrow 15 to 24 degree beam is right for uplighting a single trunk; a wide 60 degree flood suits a hedge or a wall. Match the beam to the object and you avoid the spill that washes out everything else. For broader inspiration on warmth, layering, and where fixtures land, these outdoor lighting ideas pair well with the technical choices here.
Color rendering matters too, even if no one reads the number. Look for a CRI of 80 or higher; below that, greens go gray and brick goes muddy, so the plants and materials you are trying to show lose their color at night. A warm 2700K bulb with a CRI of 90 makes a brick wall and a green hedge look the way they do at golden hour, which is exactly the effect most people are chasing without knowing how to ask for it.
Here is what to check on every bulb or fixture before it goes in the cart:
- Color temperature listed in Kelvin, ideally 2700K to 3000K.
- An IP rating of at least IP65 for anything exposed to rain.
- A dimmable LED rated for 25,000 hours or more.
- Beam angle printed on the spec, so you can aim with intent.
- A finish like bronze or matte black that hides weathering over time.
Wiring, power, and placement that lasts
Most residential outdoor lighting runs on a low-voltage 12-volt system fed by a transformer plugged into a GFCI outlet. Add up the wattage of every fixture, then choose a transformer rated about 20 percent above that total so you have room to grow. Run 12-gauge cable for longer runs to avoid voltage drop that dims the far end of the line.
Placement is where good gear still goes wrong. Bury cable 6 inches deep along bed edges where a shovel is unlikely to find it. Keep path lights off the walkway itself so mowers and feet miss them, and stagger them side to side instead of facing them in pairs, which creates a harsh tunnel. For an entertaining zone like a sport court or game lawn, the layout ideas in these bocce ball court ideas show how perimeter lighting can define a play space without blinding the players.
Control is the part people forget until the first winter. A photocell turns lights on at dusk automatically, and a timer or smart plug shuts them off at, say, 11 p.m. so you are not lighting an empty yard until dawn. Put your accent lights on a dimmer if the fixtures allow it; running an uplight at 70 percent often looks better than full blast and adds years to the LED. Leave a small service loop of cable at each fixture so you can move a light a foot or two as plants grow and the scene changes.
Common mistakes to avoid
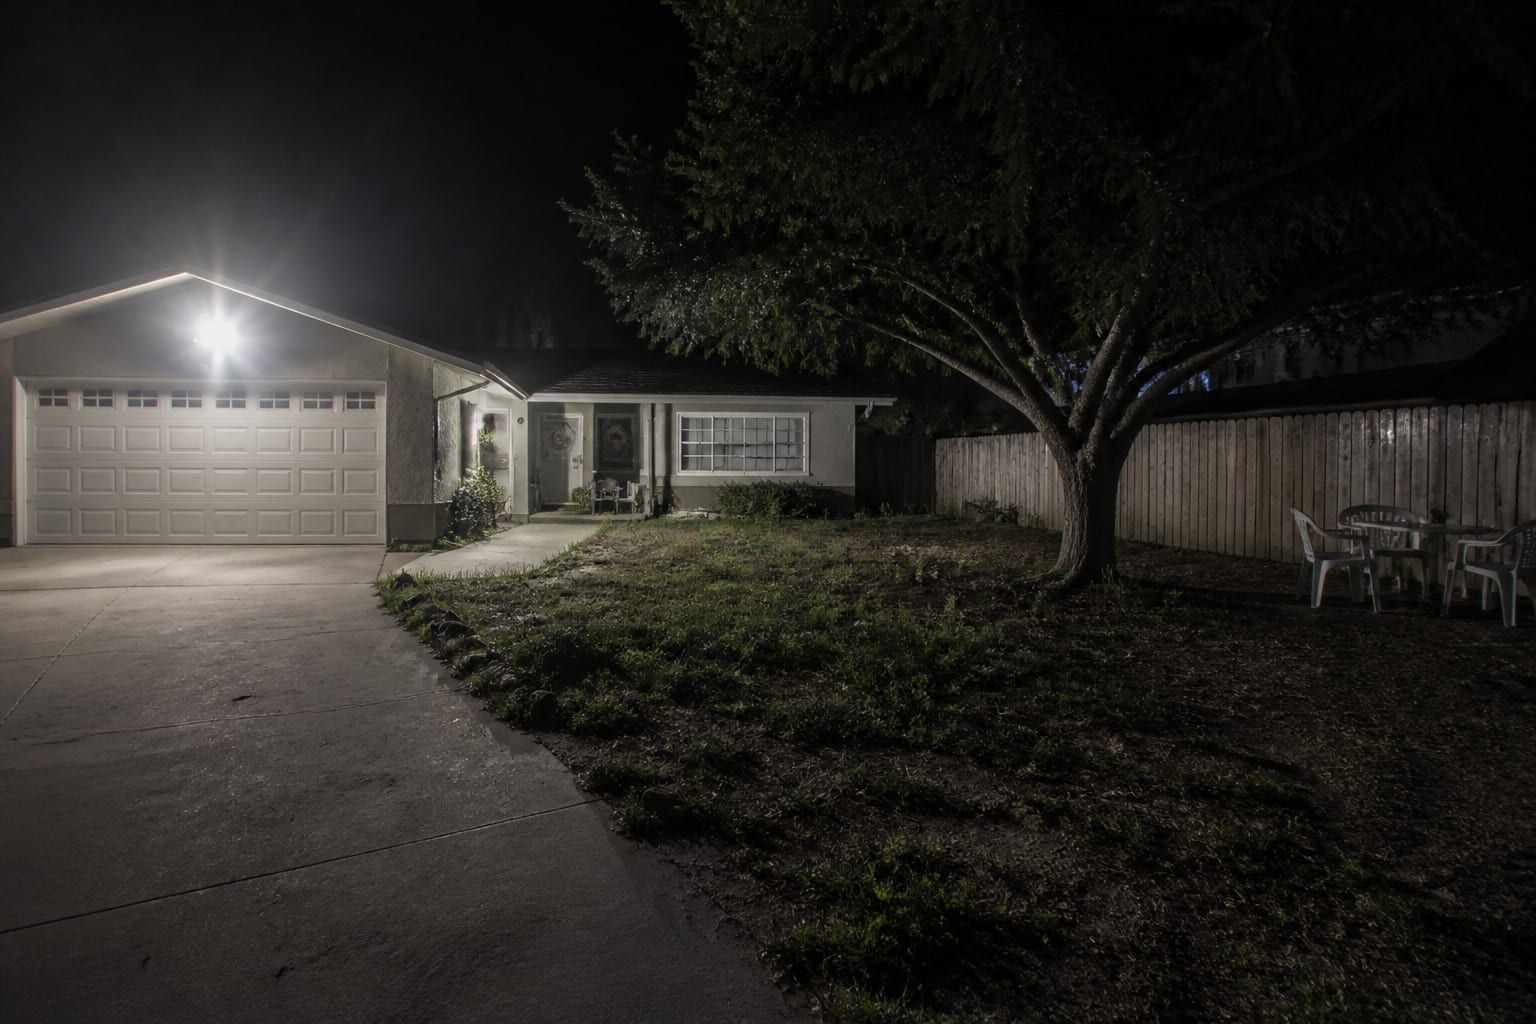
The most common mistakes to avoid all come from doing too much. Over-lighting is the worst offender: a yard lit to daytime levels loses every shadow that made it interesting. Pick a few focal points and let the rest fall into soft darkness.
Mixing color temperatures is the second trap. One fixture at 2700K next to one at 4000K reads as a mistake even to people who could not name why. Buy all your bulbs in one warmth. Pointing spotlights toward the house or the street instead of away from viewers creates glare that erases the effect; aim the light at the object and keep the source hidden. Finally, do not skip the IP65 rating or set fixtures in standing water, since moisture intrusion is the top reason cheap lights die before their second winter.
Use AI design to preview your yard lighting before you commit
Lighting is hard to imagine in advance because you are picturing your daytime yard in the dark. Re-Design closes that gap: upload a daytime photo of your patio, front entry, or garden bed and the AI re-renders the same space at dusk with warm path lights, a grazed tree, and a glowing entry. You get to see whether 2700K feels right against your brick before you buy a single transformer.
Try a few versions of the same shot. Upload the photo, ask the AI design tool to add uplighting on the maple and soft step lights on the porch, then compare it against a brighter, cooler scheme. Seeing both side by side makes the warm, restrained version obvious, and it saves you from returning a box of fixtures that looked fine on the shelf and wrong in your yard.