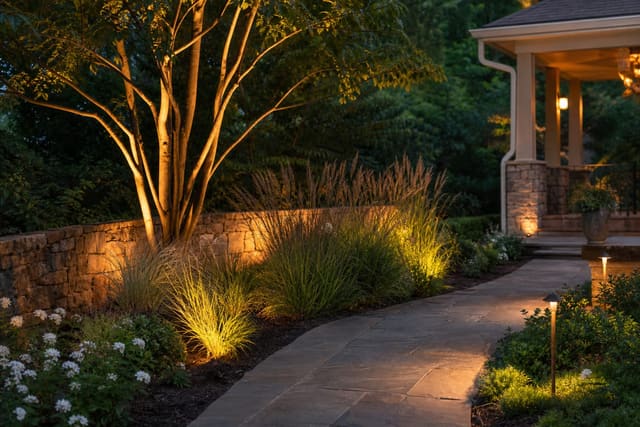
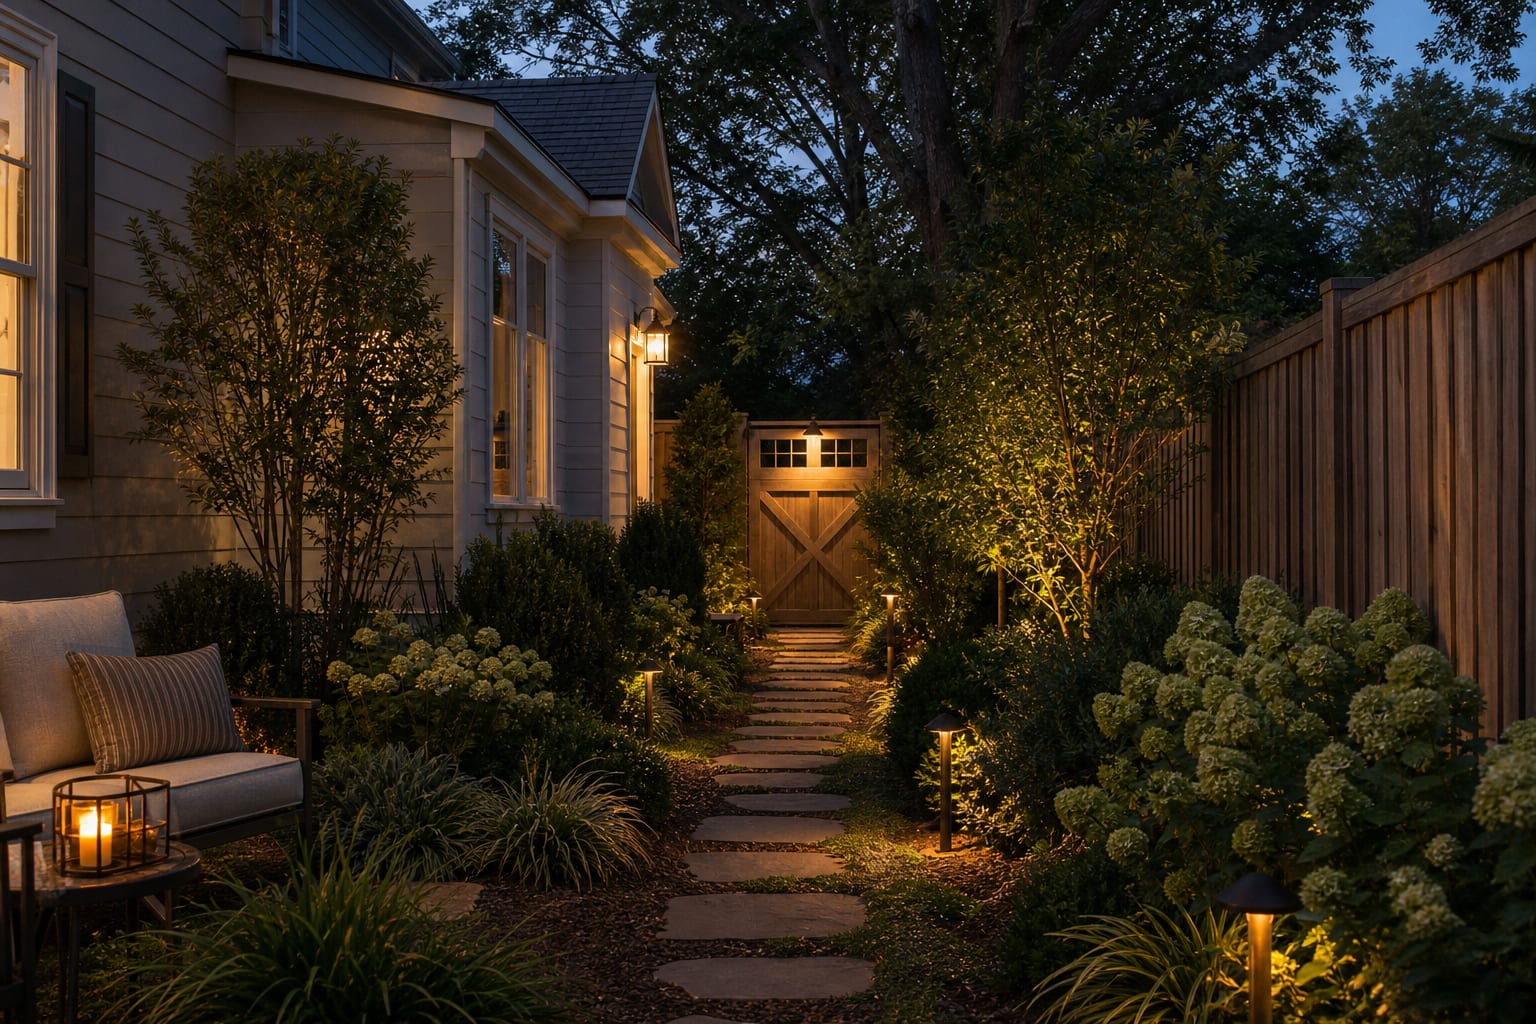
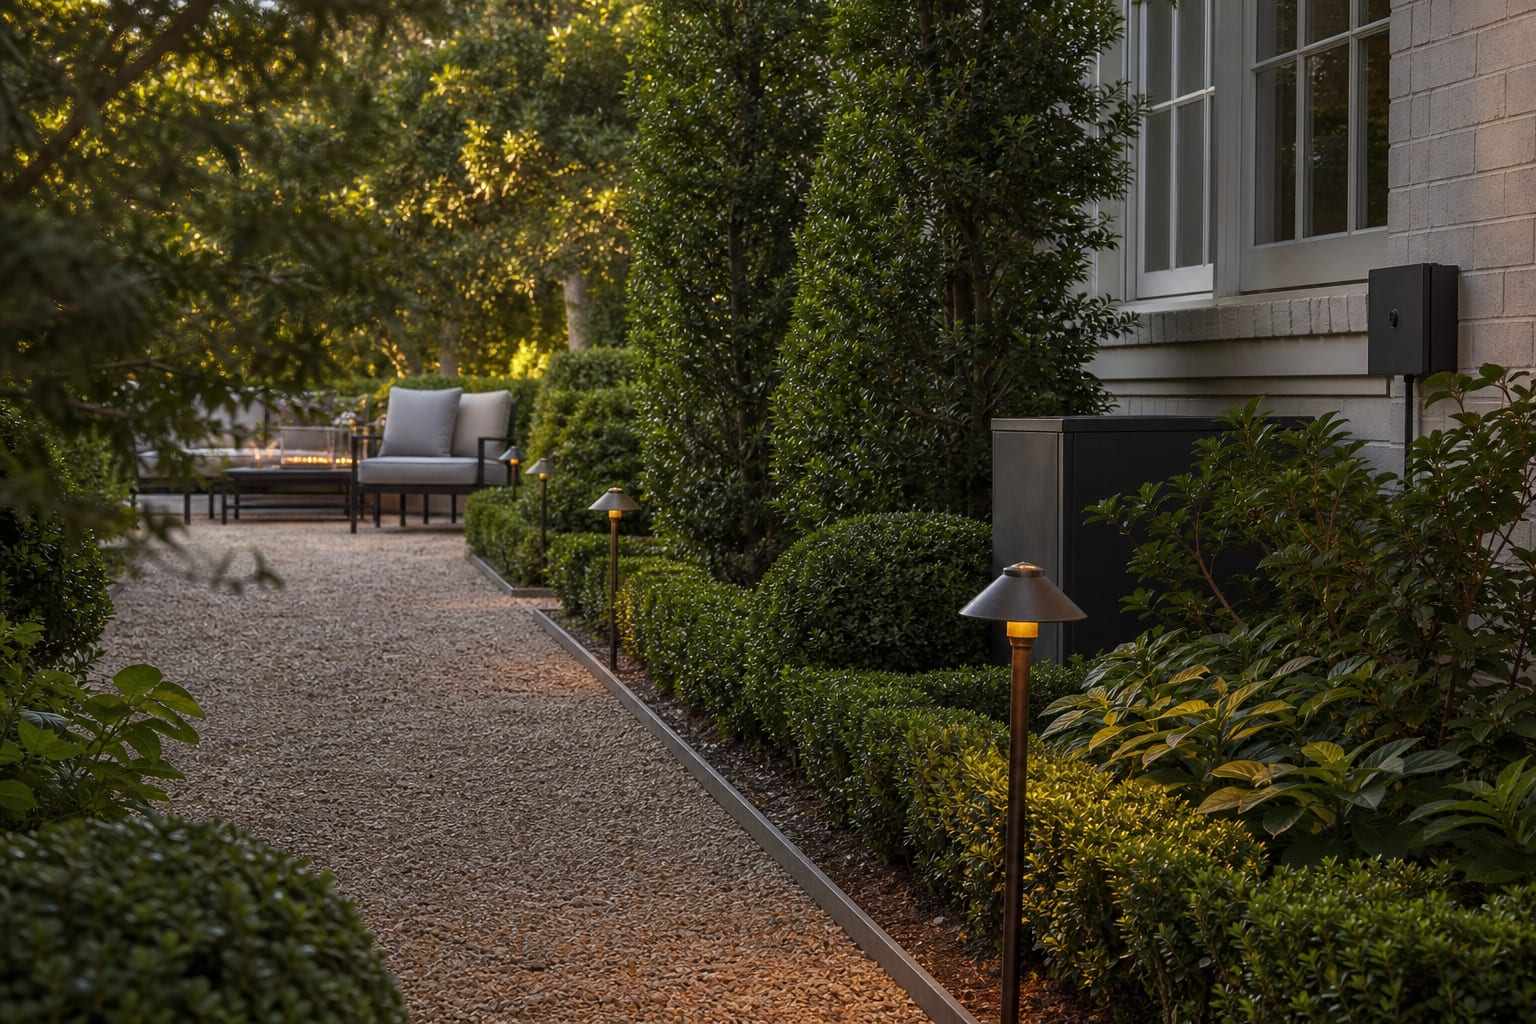
Light garden paths and walkways with shielded warm 2700K fixtures placed 6-8ft apart on alternating sides, mounted 12-18in tall so the source is hidden and only the pool of light hits the path, and on a dedicated dimmer paired with a photocell. A dark garden path is not romantic; it is a twisted ankle waiting to happen. My firm opinion: path lights should guide your feet, not decorate the yard like runway markers. The best path lighting ideas feel quiet from the house, useful underfoot, and generous enough for guests who do not know where the steps change. Here is how to light a walkway so it becomes safer after sunset without flattening the garden into glare.
What makes path lighting safe without making the garden look overlit?
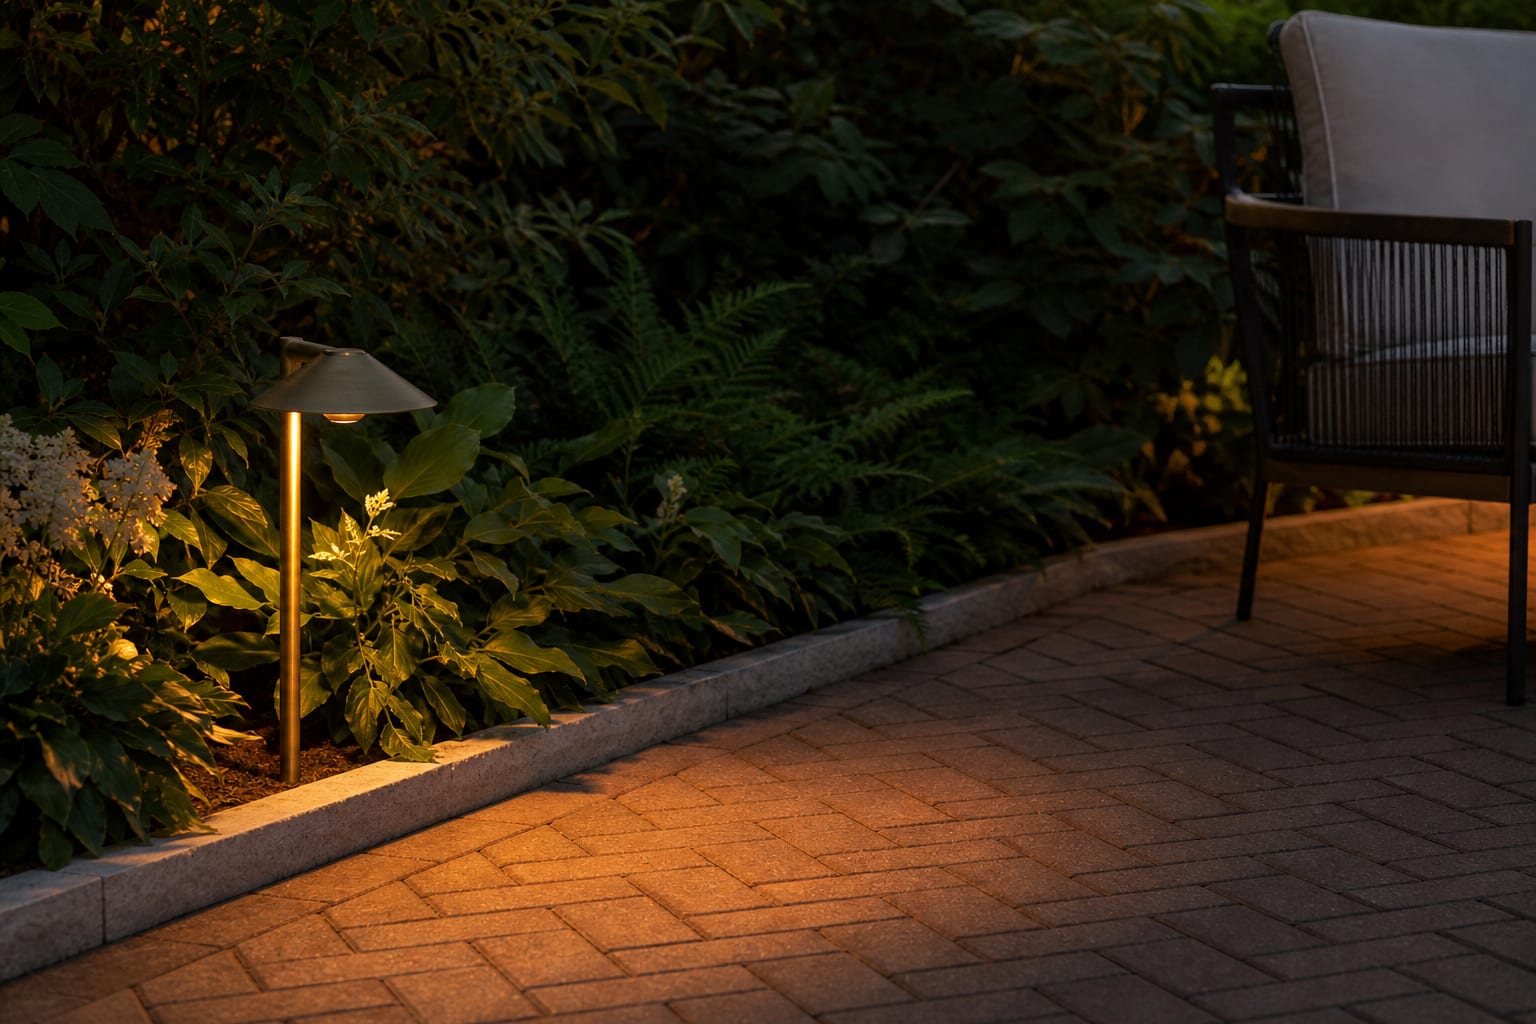
Safety comes from contrast at the walking surface, not from throwing light everywhere. A good fixture shields the lamp so you see the path edge, the stone joint, the gravel transition, or the first stair tread before you see the bulb. If the fixture is visible from a seated patio or bedroom window, pick a louvered cap, frosted lens, or down-facing mushroom head rather than a bare lantern shape.
Think in pools of light rather than continuous brightness. The eye can follow a rhythm when each pool overlaps gently with the next, but it gets confused when bright spots sit beside black gaps. On a 36-inch-wide front walk, one-sided lighting is usually enough if the beam spreads across the full width. On a 5-foot-wide garden path, stagger fixtures from side to side so the walkway feels guided instead of lined.
Material matters after dark. Pale concrete needs less light than dark flagstone. Gravel needs edge definition because loose texture disappears at night. Brick walks look best with warm light grazing across the surface, while glossy pavers can kick glare back at the viewer. If your path connects to an outdoor stair, handle the stair separately with outdoor step lighting that marks each tread instead of expecting path stakes to solve the hazard from the side.
The spacing decision that changes every walkway
The mistake is buying twelve identical fixtures before deciding where darkness is actually a problem. Stand at the door, the driveway, and the garden gate at night, then mark the places where your foot hesitates. Those marks matter more than a catalog diagram.
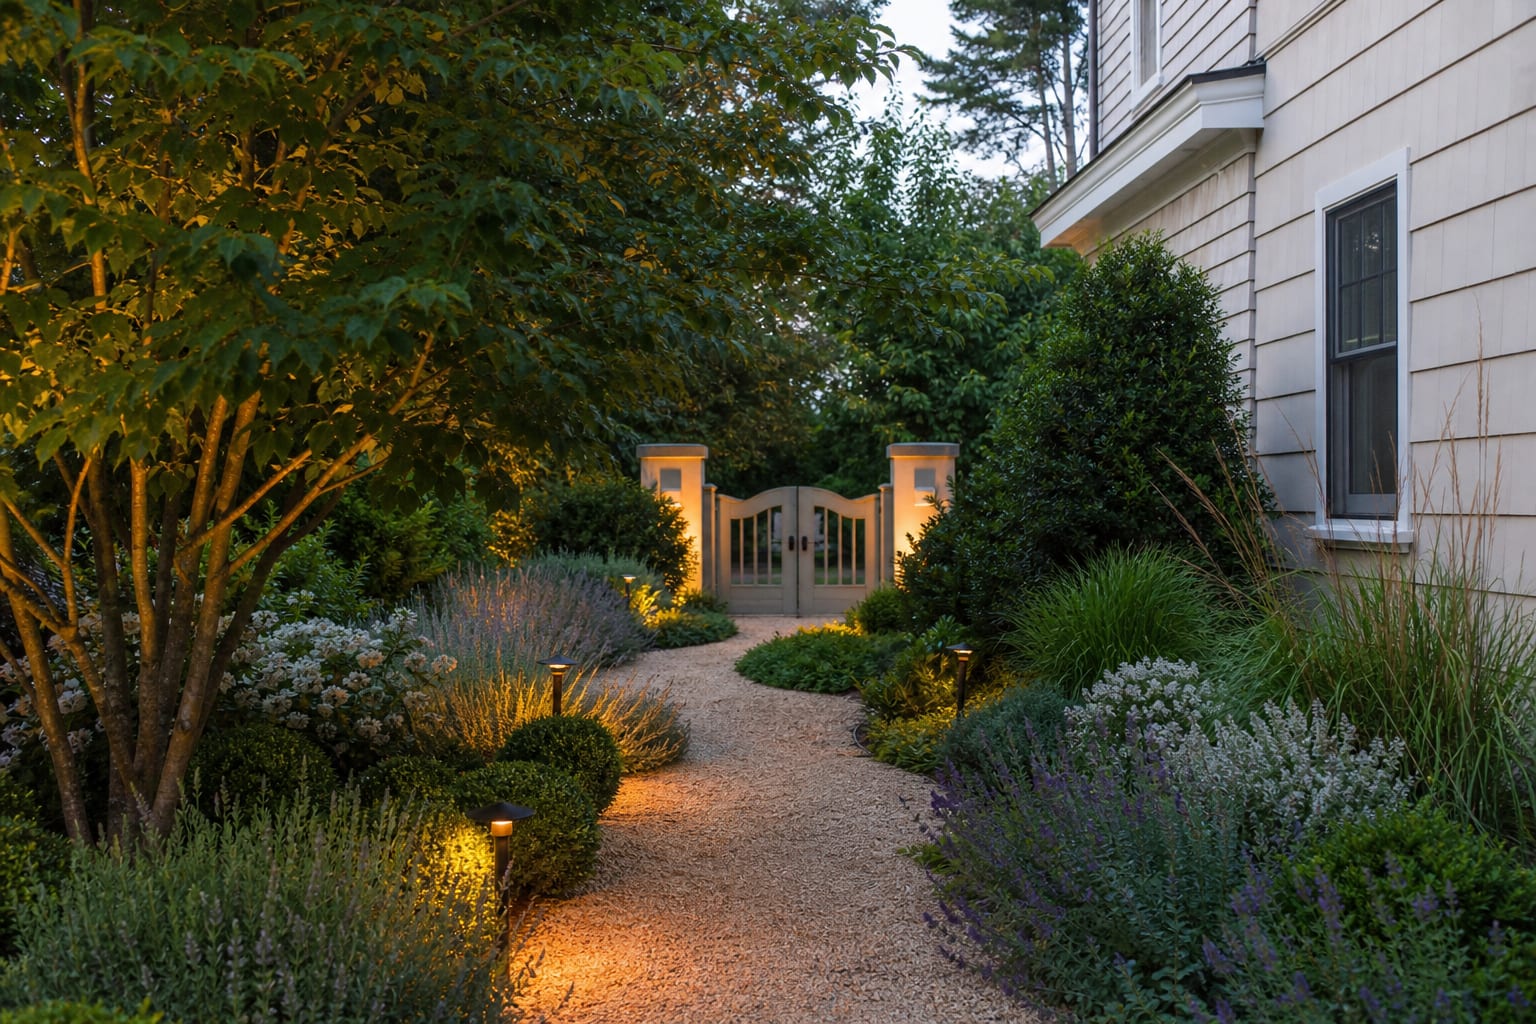
- Light the destination first, because a path feels safer when the eye can find the front door, gate latch, shed, dining terrace, or pool fence; use one stronger downlight or wall light at the endpoint before sprinkling small fixtures along the route.
- Mark direction changes with paired or staggered lights, because curves and turns are where guests lose the path; place fixtures within about 2 feet of the bend and let the beam catch the inside edge.
- Give steps their own layer, because a 6-inch riser can vanish when shrubs cast shadows across it; use recessed tread lights, under-cap lights, or side-mounted fixtures at every tread rather than one path light at the bottom.
- Keep lights out of mower and shovel paths, because a perfect layout fails fast when a fixture gets clipped every weekend; set stakes 6 to 12 inches outside the walking edge and leave more room near snow piles or edging tools.
- Use planting as a screen, because a low grass, lavender, boxwood, or fern can hide the fixture body while letting the beam cross the walk; keep foliage trimmed below the lens so the lamp does not become a backlit blob.
- For long straight walkways, resist the airport-runway effect. Alternating fixtures at 8-foot intervals is often calmer than placing pairs directly across from each other. If the walk is narrow, every other light can move to the planting side with denser foliage, while the open lawn side stays quiet. A front yard with a strong tree or blank facade may also need one layer of subtle landscape uplighting near the path so the route has depth beyond little pools at your ankles.
Test this on your own photo with ReDesign before you choose the final outdoor direction; keep the house edge, horizon line, hardscape, planting beds, and main path visible so the preview solves the space you actually have.
Where low voltage path lights beat solar fixtures
Solar lights are fine for a secondary herb path or a seasonal rental patio, but they are not my first choice for the route people use every night. Low voltage path lights win when the walkway is part of the house’s safety plan: front entry, side gate, trash route, pool path, detached garage, or guest parking.
| Decision | Low voltage path lights | Solar path lights | |---|---|---| | Reliability | Best for main walkways because the transformer supplies steady power on cloudy weeks and winter evenings. | Best for casual garden accents where dim output after a gray day is annoying but not dangerous. | | Control | Works with timers, photocells, dimmers, and zones, so the front walk can stay on while the garden bed turns off. | Usually controlled fixture by fixture, which makes a clean lighting scene harder to tune. | | Installation | Needs cable buried about 6 inches deep in many residential layouts, with a transformer sized for the total wattage plus room for future fixtures. | Needs no trenching, but each fixture needs enough sun exposure and a battery that will eventually weaken. | | Appearance | Better fixture options in brass, bronze, black aluminum, and architectural caps. | Often bulkier because the solar panel sits on top of the fixture head. |
For most homes, choose LED fixtures between 2 and 5 watts each, then dim or zone the circuit if the path feels too bright. A 60-watt transformer can handle many small LED path lights, but the better design move is leaving capacity for one future gate light or tree accent. Use direct-burial cable rated for landscape lighting, protect it at bed edges, and document the cable route with photos before mulch goes back down.
Common path lighting mistakes
- Picking exposed bulbs because they look charming in daylight fails at night when the lamp becomes the brightest object in the garden; choose a cap or lens that hides the source from normal standing height and throws light down.
- Lining both sides of a narrow walk makes the yard feel like a hotel entrance; use one side, stagger the fixtures, or save paired lights for important moments such as a gate, stair, or landing.
- Using cold white lamps makes planting look flat and makes stone feel cheap; stay near 2700K for brick, gravel, mulch, and warm stone, and use 3000K only when the house exterior is very crisp or modern.
- Forgetting plant growth turns a good layout into a maintenance problem; place fixtures where shrubs will not swallow them in one season, and leave 12 to 18 inches of clearance around grasses that arch outward.
- Treating path lights as the only outdoor layer leaves the garden with glowing dots and black walls; add one soft wall wash, tree accent, or trellis glow where the route needs a visual destination. If the walkway runs beside an exposed fence, planting a privacy trellis along the route can make the lighting feel intentional instead of lonely.
Use AI design to preview walkway lighting before you buy fixtures
Path lighting is hard to judge from product photos because the real question is the whole route: paving color, shrub height, porch light, gate location, grade changes, and the view from inside the house. Upload a dusk or early-evening photo of the walkway and test two or three lighting plans before ordering fixtures. Ask for warm shielded path lights, a visible pool of light on the walking surface, realistic 6-to-10-foot spacing, and no extra fantasy landscaping that would not fit your bed depth.
The preview is especially useful when you are torn between black, bronze, and brass fixtures. Black can disappear beside dark mulch, bronze is forgiving in mixed gardens, and brass looks excellent near brick, limestone, cedar, or traditional front entries. Keep the AI result honest by comparing it with your actual porch light temperature and by checking whether the fixture heads would shine into a bedroom, neighbor’s window, or seating area.
Once the preview shows a path that reads clearly from the curb and from the back door, order one sample fixture before buying the full run. Place it in the bed at night, test the beam on the real paving, and adjust height or spacing before trenching cable. That one evening of testing usually prevents the two expensive errors: too many fixtures and the wrong light temperature.
Frequently Asked Questions
How far apart should path lights be spaced?
6-8ft apart on alternating sides for fixture heights 12-18in; closer spacing reads as an airport runway, wider spacing leaves dark gaps between pools of light. Use the outdoor photo to compare the visible layout and fixed constraints before committing, because slope, shade, drainage, doors, utilities, and traffic paths decide whether the idea survives daily use.
What height should path lights be?
12-18in for most fixtures; mushroom-cap fixtures should sit low and shielded so the bulb is invisible from a standing viewer's eye line. Keep the preview honest by leaving the problem area visible in the frame, then compare one conservative version against one bolder version before you buy plants, materials, or furniture.
Are solar path lights worth it?
Solar fixtures suit gravel beds and remote runs without trenching but dim after two hours; hard-wired low-voltage fixtures hold consistent brightness all night and last 15-20 years. Check the result against ordinary movement first: chair pullout, walkway width, gate swing, glare, storage reach, and evening light matter more than a perfect catalog angle.
How many lumens does a path light need?
60-120 lumens per fixture is enough for a residential path; higher lumens wash the planting beds and ruin night-sky reading. Use the image to narrow priorities and measurements before ordering anything custom; final purchases still need real dimensions, code checks, utility locations, and product clearances.
Where should path lights be avoided?
Avoid placement directly under tree canopies where leaves block the pattern, at the foot of stairs where they create shadow trip hazards, and in straight rows that turn the path into a runway. If the preview invents architecture or hides the awkward feature you need solved, rerun it with stricter instructions so the result remains tied to your actual outdoor space.
Three transformations to try