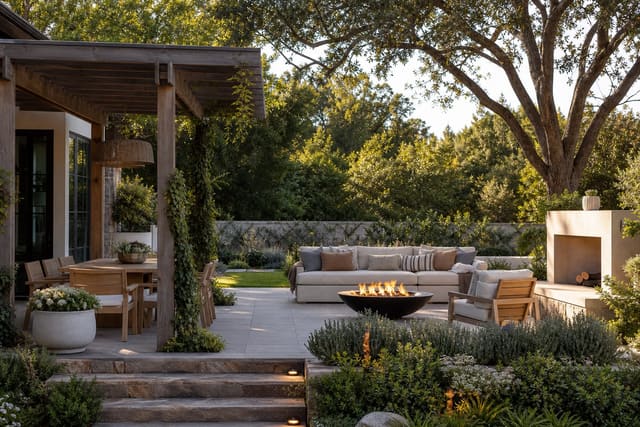
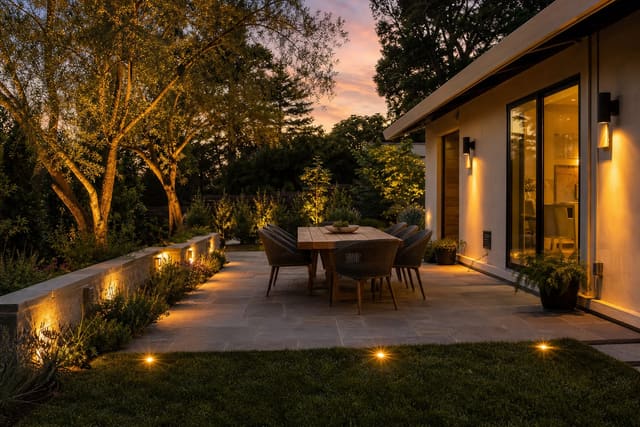
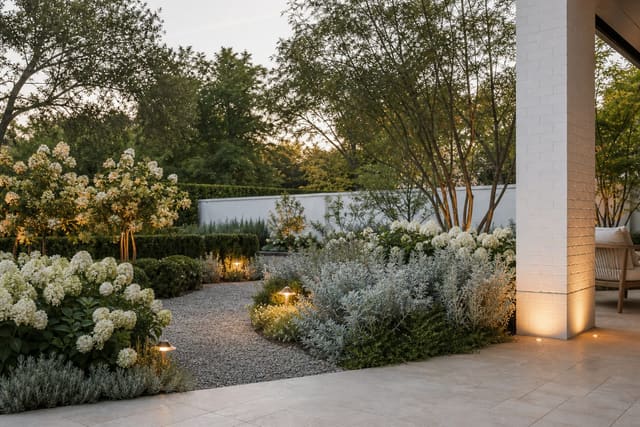
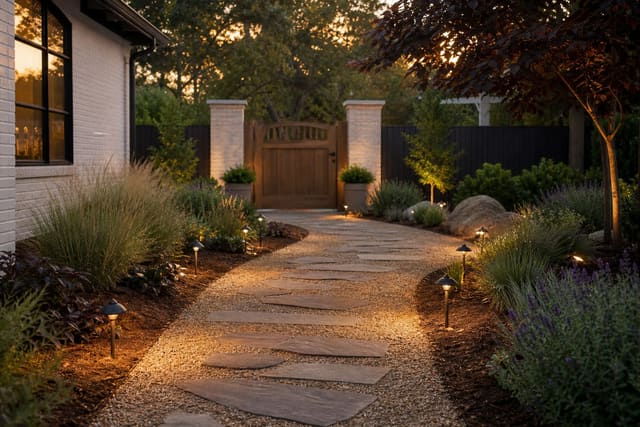
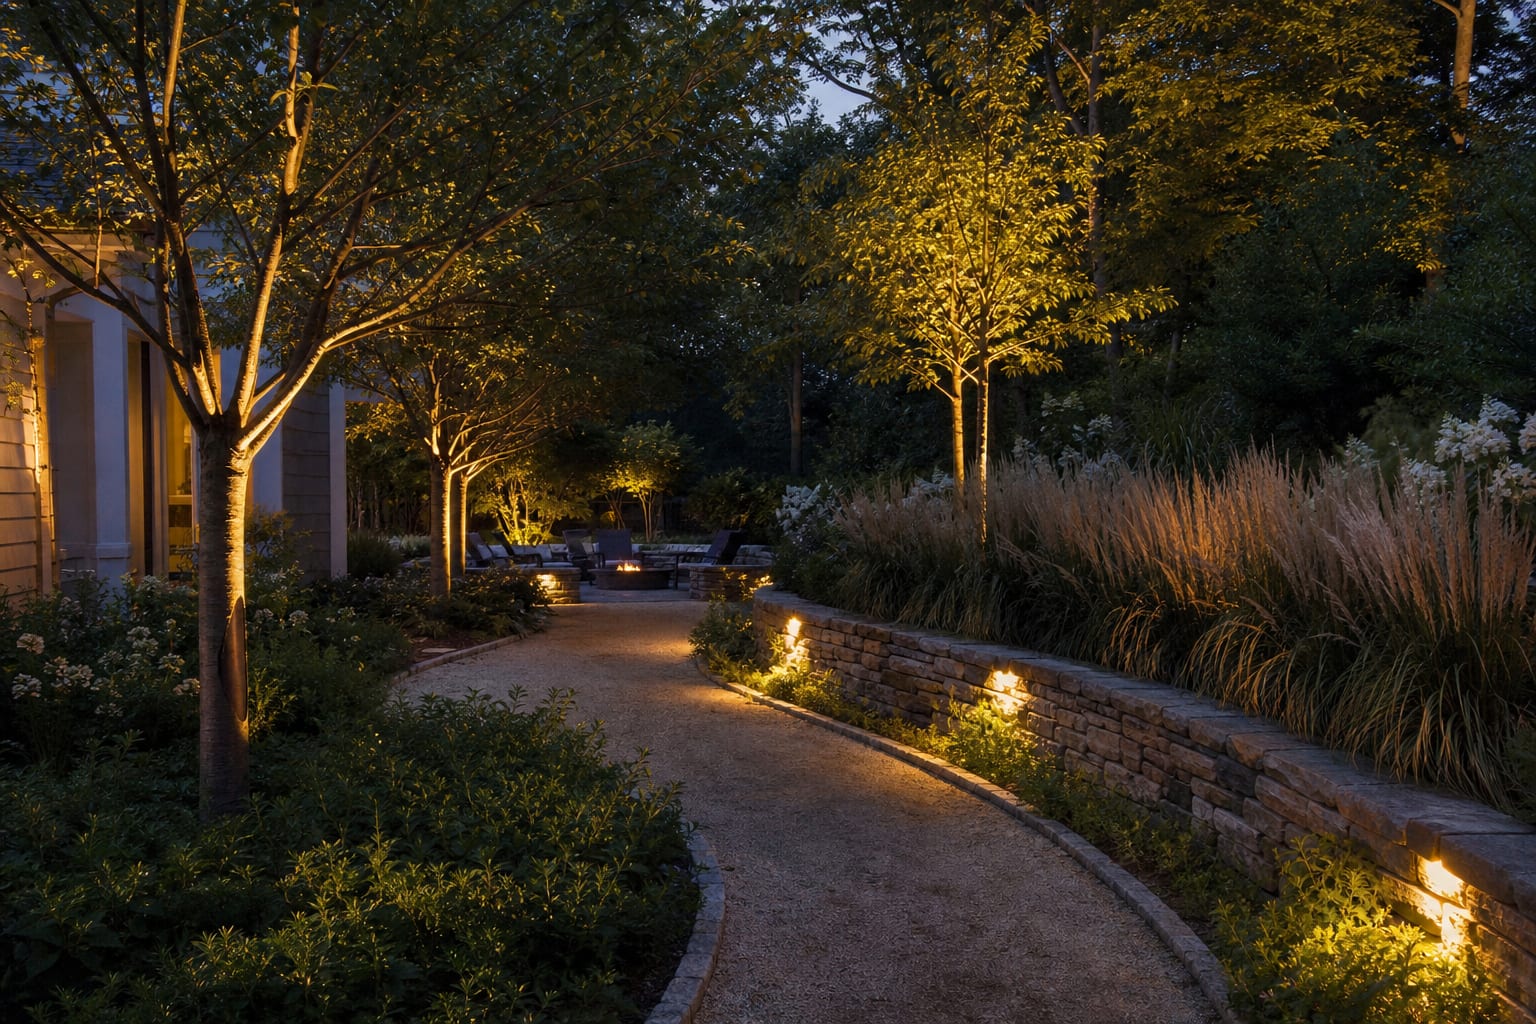
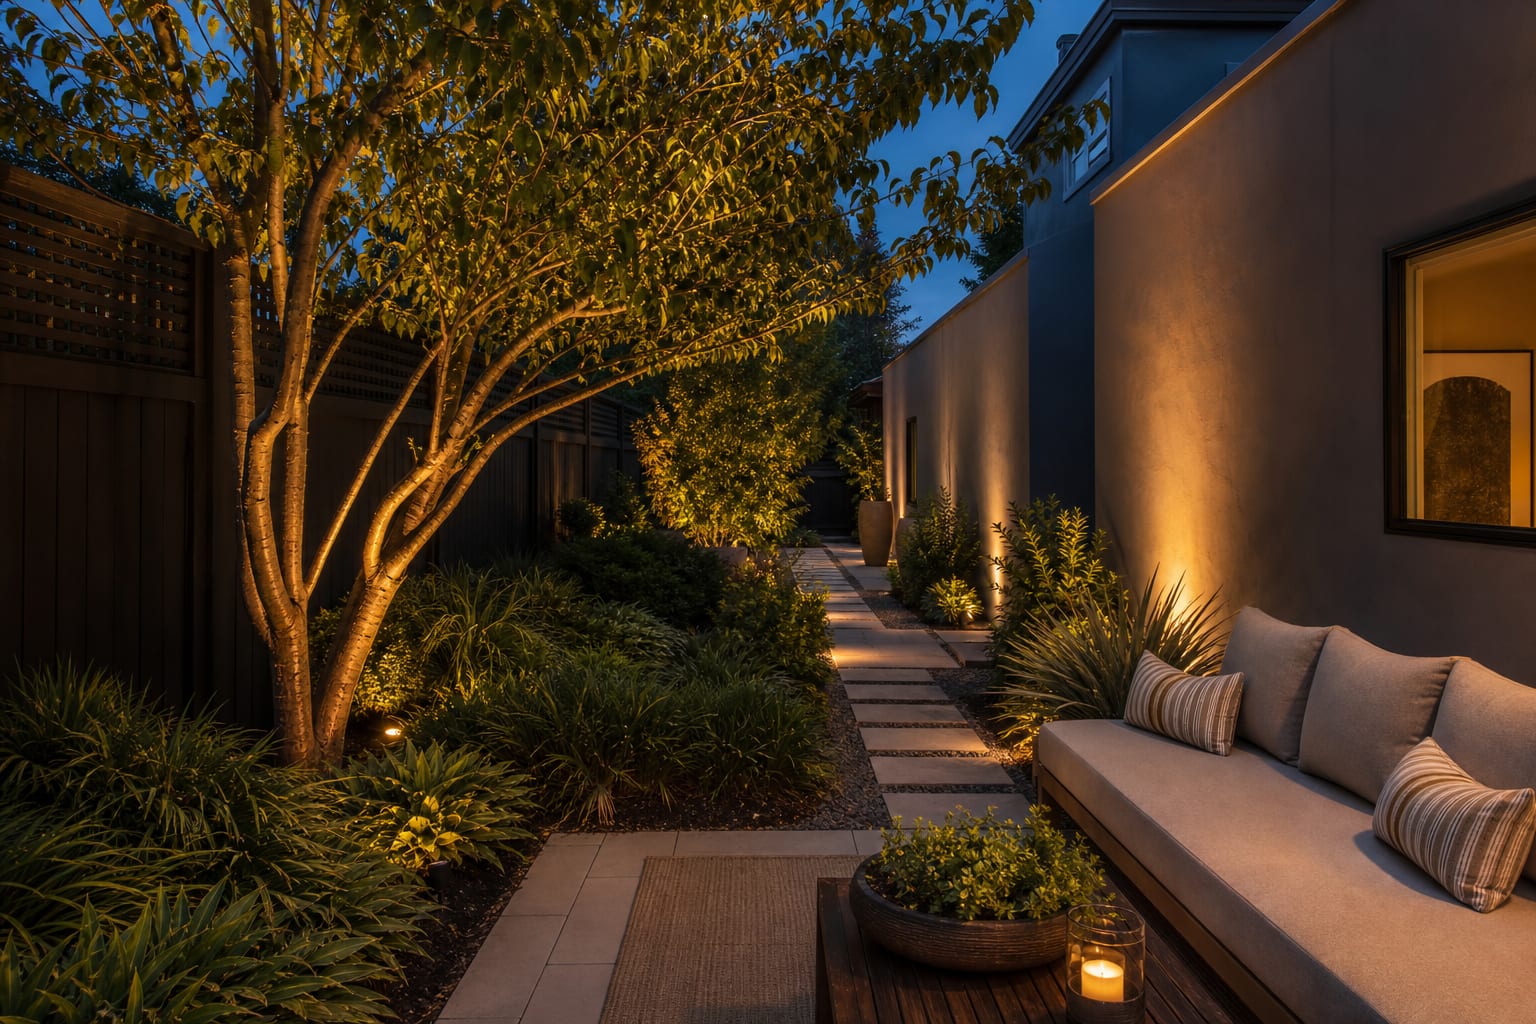
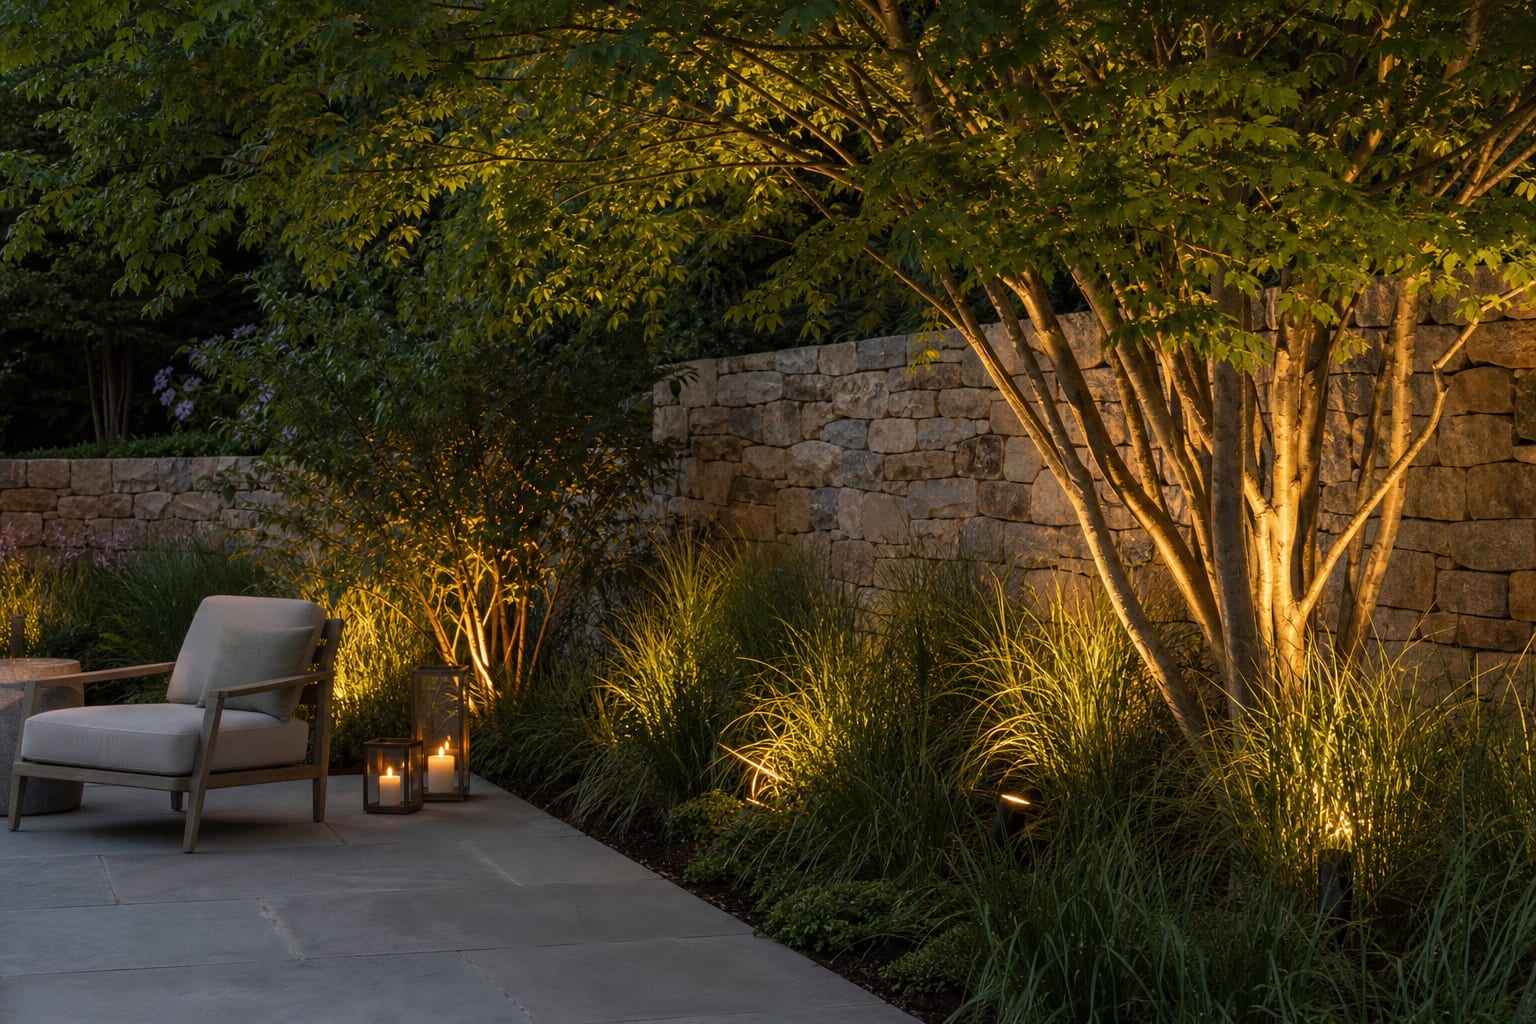
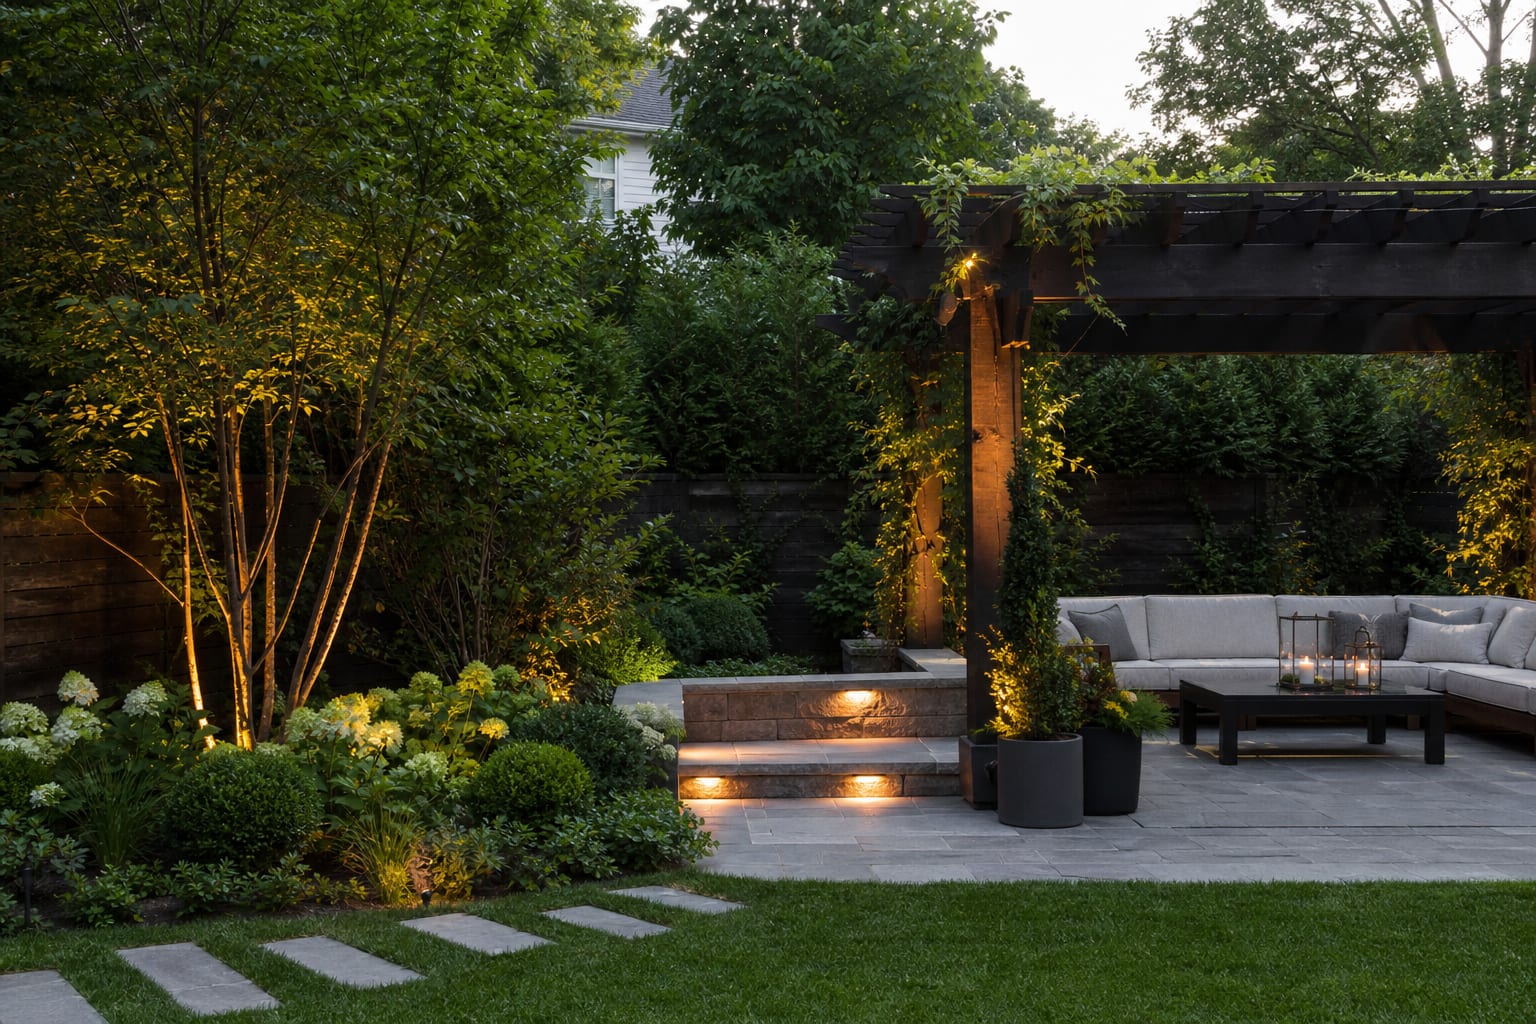
Landscape uplighting works when you light three to five features (not the whole yard), pick warm 2700K fixtures with shielded glare control, set lumens at 200-500 for trees and 50-150 for shrubs, place each fixture 12-24in off the base of the feature with the beam aimed away from the viewer, and run everything off a low-voltage transformer. Most garden uplighting fails because people try to light the whole yard, and that is the wrong instinct. A good night garden needs contrast: a few lit trunks, textured shrubs, stone, and shadow doing real work. I would rather see three precise fixtures than twelve bright ones scattered like airport markers. The goal here is to make your garden feel dimensional after dark without glare, wasted light, or a maintenance headache.
What makes garden uplighting look intentional instead of spooky?
Intentional uplighting starts with restraint: light the object that deserves attention, not the mulch around it. The best gardens have a rhythm of lit and unlit zones, with at least 6 to 10 feet of visual rest between major accents in a small yard. If every shrub gets a beam, the garden loses hierarchy and the house starts to look like a commercial entrance.
A simple hierarchy works better than a fixture shopping spree. Use uplights for vertical drama, path lights for walking comfort, and step lights only where someone could misjudge a level change. If the garden also needs safer movement from the driveway to the patio, pair the uplights with low path lights that create softer pools rather than making tree fixtures do circulation work.
| Lighting move | Best use | Spec to copy | |---|---|---| | Narrow accent beam | Tall tree trunks or columns | 10° to 20° beam spread | | Medium uplight | Small trees and large shrubs | 25° to 40° beam spread | | Wall graze | Stone, brick, board-formed concrete | Fixture 6 to 12 inches from surface | | Soft wash | Broad hedge or fence backdrop | Fixture 18 to 36 inches away |
The darkness matters as much as the beam. Leave lawn panels, gravel paths, and low groundcovers mostly unlit unless they guide movement. That negative space gives the lit trees and structures a silhouette, and it keeps your garden from flattening into one bright sheet.
Where should tree uplighting outdoor fixtures go?
Tree uplighting outdoor fixtures should sit where the trunk, branching structure, and canopy can all catch light without shining directly into a window or seating area. For a single young tree, start with one adjustable spot 12 to 18 inches from the trunk, aimed just off-center so the bark gets texture instead of a flat stripe. For a mature tree with a 20-foot canopy, use two lower-output fixtures on opposite sides rather than one aggressive lamp blasting up the middle.
Deciduous trees and evergreens need different treatment. A lacebark elm, crape myrtle, Japanese maple, or sycamore rewards a tighter beam because bark and branching are part of the show. Dense evergreens, clipped hollies, and podocarpus hedges usually look better with a wider 30° to 40° beam placed 18 to 30 inches out, because the surface is solid and absorbs light quickly.
In-ground uplights landscape designers use near paving can look beautifully quiet, but they are not automatically better than staked fixtures. Recessed cans need drainage, a gravel base, and a lens that can be cleaned; otherwise leaves, soil, and irrigation overspray turn the beam muddy. In a lawn, I prefer a slightly raised, shielded fixture unless the maintenance crew is careful with mowers and string trimmers.
Shrubs deserve fewer uplights than people think. One multi-stem shrub at the corner of a patio can be gorgeous; six identical shrubs lit from below can look nervous and repetitive. If privacy is part of the night view, combine one or two uplights with layered planting or a screen; a privacy trellis with climbing plants often gives the light something better to catch than a bare fence.
Test this on your own photo with ReDesign before you choose the final outdoor direction; keep the house edge, horizon line, hardscape, planting beds, and main path visible so the preview solves the space you actually have.
The five landscape uplighting ideas worth copying
These landscape uplighting ideas work because each one has a clear subject, a beam strategy, and a reason to exist after sunset.
- Uplight one sculptural tree at the end of a path. Place a 2700K narrow-beam fixture 12 to 24 inches from the trunk and aim it through the branching, not straight at the leaves; the tree becomes a destination without needing a bright path all the way around it.
- Graze a stone or brick garden wall from close range. Set fixtures 6 to 10 inches off the surface with shields facing the viewer, because shallow light catches mortar joints, rough stone, and brick relief far better than a floodlight mounted across the bed.
- Backlight ornamental grasses instead of front-lighting every plume. Put the beam behind or slightly beside grasses like miscanthus, fountain grass, or muhly, then keep the lamp low enough that the seed heads glow while the fixture stays hidden below 18 inches of foliage.
- Use paired uplights on a pergola post or masonry column. A 20° to 30° beam on each side can define the structure without lighting the whole patio ceiling, and the effect feels architectural rather than decorative.
- Highlight one large shrub at a corner where the house meets the garden. Keep the fixture 18 to 30 inches out from the plant and angle it across the face, which softens the building corner and gives depth to a blank wall at night.
- 
Do not make every idea compete in the same sightline. From a kitchen window, you might see the wall graze and one tree. From the patio sofa, you might see the grasses and pergola post. Good uplighting garden design edits each view separately, then lets the full yard connect as you move through it.
Common uplighting mistakes to avoid
The most common mistake is aiming a fixture too vertically. A beam pointed straight up creates a hard column of light and often misses the bark, leaves, or wall texture that justified the fixture in the first place. Tilt the head 5 to 15 degrees toward the subject and check it from the house, the patio, and the sidewalk before locking it down.
Another mistake is using lamps that are too cool or too bright. Many outdoor fixtures can accept high-output bulbs, but a small garden bed rarely needs them. Start lower, use 2700K to 3000K, and reserve stronger output for tall trees, second-story walls, or deep canopies where the light has somewhere to go.
People also forget steps while obsessing over trees. A glowing oak does not help if guests trip over a dark terrace edge on the way to dinner. When level changes sit near the garden view, use dedicated outdoor step lighting with controlled glare and let the uplights stay focused on vertical form.
Flat symmetry is another trap. Matching one uplight under every trunk can make a garden feel staged, especially with mixed plant sizes. Vary fixture distance, beam width, and brightness so the Japanese maple, hedge, and stone pier do not all shout at the same volume.
Finally, do not ignore irrigation and maintenance. Keep fixtures out of sprinkler spray when possible, leave enough slack in low-voltage cable for plant growth, and avoid burying adjustable heads under mulch. If a lens needs wiping every week because it sits below a messy tree, that fixture belongs somewhere else.
Use AI design to preview garden lighting before you trench
AI design is useful here because uplighting is hard to judge from a daytime shopping list. Upload a dusk or early-evening photo of the garden, then test a few scenarios: one lit tree, a grazed wall, a darker path, a brighter pergola post. The preview will not replace a lighting professional's beam calculations, but it can reveal the big composition errors before you cut sod, run 12-volt cable, or core-drill a paver.
Take the photo from the place you actually notice the yard: the patio chair, the kitchen window, the front walk, or the bedroom balcony. Keep the camera level, include the full tree canopy if possible, and shoot before the garden becomes completely black. Then compare versions where the brightest point is the tree, the wall, or the seating area. The right version usually has fewer lit objects than you expected.
Once the layout feels right, translate the image into a real fixture plan. Mark approximate locations with stakes, test temporary clamp lights or battery spots for beam direction, and walk the garden after dark before buying recessed cans. That extra night of testing is cheaper than moving conduit later.
Frequently Asked Questions
What features should I uplight in a yard?
Three to five high-impact features — a specimen tree, an architectural detail on the house, a textured wall, a planted bed, or a sculpture — not every plant; saturation lighting reads as a commercial property, not a residential yard. Use the outdoor photo to compare the visible layout and fixed constraints before committing, because slope, shade, drainage, doors, utilities, and traffic paths decide whether the idea survives daily use.
What color temperature works best for landscape uplighting?
Warm 2700K for residential — it reads inviting and complementary to interior light spilling outside; 3000K is acceptable, anything above 3500K reads as commercial parking-lot light. Keep the preview honest by leaving the problem area visible in the frame, then compare one conservative version against one bolder version before you buy plants, materials, or furniture.
How bright should uplights be?
200-500 lumens for trees over 15ft, 100-300 lumens for shrubs and accents, and 50-150 lumens for low plantings — too bright and the feature blows out into a hot spot. Check the result against ordinary movement first: chair pullout, walkway width, gate swing, glare, storage reach, and evening light matter more than a perfect catalog angle.
Can I install landscape uplighting myself?
Yes for low-voltage 12V kits — they don't require a licensed electrician for the wire run beyond the transformer; line-voltage 120V landscape lights need professional installation in most jurisdictions. Use the image to narrow priorities and measurements before ordering anything custom; final purchases still need real dimensions, code checks, utility locations, and product clearances.
Will landscape uplighting bother my neighbors?
Yes if fixtures are unshielded or aimed toward property lines — use full-cutoff or shrouded fixtures and aim beams downward or onto your own architecture; light spilling into a bedroom window will end the neighborly relationship. If the preview invents architecture or hides the awkward feature you need solved, rerun it with stricter instructions so the result remains tied to your actual outdoor space.
Three transformations to try